Wi-FiマイコンXIAO ESP32S3のWebサーバ動作
温度センサBMP280ブレイクアウトボード使用
連続データログ取得
2023.10.1 Coskx Lab
1 はじめに
Wi-FiマイコンXIAO ESP32S3を使って,温度情報を発信できるWi-Fi接続のWebサーバを作りました。
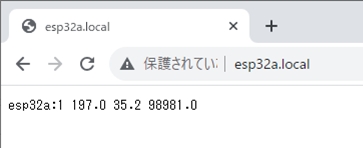
ブラウザから"http://esp32a.local/"でアクセスすると,次のようにその時のデータを返してきました。

上記単純サーバ記事へ戻る ≫
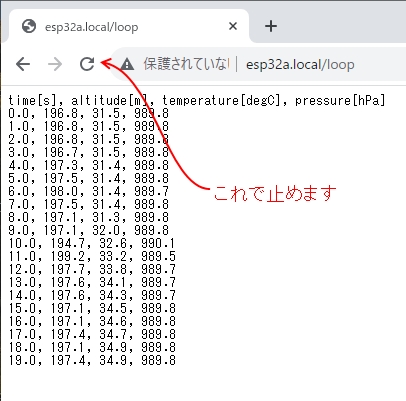
ここでは,Webブラウザから"http://esp32a.local/loop"でアクセスすると,次のように連続データを返してくるプログラムに機能を追加します。

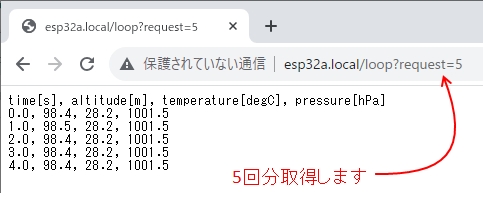
さらに取得するデータ個数も指定できるようにします。

2 使用環境
- Windows 10 64-bit
- ArduinoIDE 2.2.1
- XIAO ESP32S3
- BMP280 (HW-611 E/P 280)
- WindowsPCもXIAO ESP32S3も同じアクセスポイントでWi-Fi接続可能
- WindowsPCもXIAO ESP32S3も同じLAN内接続
- LAN内でDHCP(Dynamic Host Configuration Protocol)サーバが稼働中
3 XIAO ESP32S3と温度センサBMP280の配線
httpサーバ制作記事を参照してください。≫
4 XIAO ESP32S3のスケッチコード(サーバプログラム)
クライアント(例えばPCのwebブラウザ)からのリクエストで,サーバであるXIAO ESP32S3は,温度センサBMP280の値を取得し,クライアントに返します。
送信ではHTTP通信の手順に従います。
setupでは,自分が接続すべきWi-FiアクセスポイントのSSIDとパスワードを設定して,LANの一員になろうと試みます。
成功すると,LAN内のDHCPサーバからIPアドレス(一次的な)をもらいます。
またmDNSプロトコルで,自分のホスト名を有効にします。
LAN内機器についてDNSサーバはホスト名の解決ができないので,WebブラウザはIPアドレスでアクセスしてくるのですが,mDNSのおかげでホスト名+".local"(ブラウザが賢いのでホスト名だけでもOK)としてアクセスすることができます。
ここでは,"http://esp32a.local/"でアクセスできます。IPアドレスはDHCPサーバによりマイコン起動時に自動で割り当てられるので,いつも同じIPアドレスになっているとは限らないため,サーバ名(ホスト名)でアクセス可能になるmDNSの仕組みはありがたいです。
単純アクセスがあると,温度センサBMP280から,温度と気圧を取得し,標高を計算し,"ホスト名:レスポンス回数","標高","温度","気圧"の文字列をスペース区切り型式で1回だけ返すようにしています。
連続取得アクセスのときには,"時刻","標高","温度","気圧"の文字列をカンマ区切り型式で,1秒間隔で返すようにしています。
次のコードは,IDEの既存スケッチ例"HelloServer.ino"を元に作ったものです。
ライブラリ"Grove_-_Barometer_Sensor_BMP280"を予め追加しておいてください。
http://esp32a
Obtains and transmits data once.
http://esp32a/loop
Repeatedly obtains and transmits data
until the stop button of the web browser is tapped.
http://esp32a/loop?request=10
Repeatedly obtains and transmits the data ten times.
The number of repetitions can be set arbitrarily.
*/
#include <WiFi.h>
#include <WiFiClient.h>
#include <WebServer.h>
#include <ESPmDNS.h>
#include <Seeed_BMP280PP.h>
#define STASSID "REPLACE_WITH_YOUR_SSID"
#define STAPSK "REPLACE_WITH_YOUR_PASSWORD"
const char* ssid = STASSID;
const char* password = STAPSK;
const char* servername = "esp32a";
const int interval = 1000; //Continuous data acquisition interval
int count = 0;
WebServer server(80);
const int led = LED_BUILTIN;
int ledonoff = 0;
BMP280PP bmp280;
void handleRoot() {
digitalWrite(led, ledonoff = 1 - ledonoff);
float temperature = bmp280.getTemperature();
float pressure = bmp280.getPressure();
float altitude = bmp280.calcAltitude(pressure);
char chrs[128];
sprintf(chrs, "<html><body>%s:%d %.1f %.1f %.1f</body></html>"
, servername, count++, altitude, temperature, pressure);
String message = String(chrs);
server.send(200, "text/html", message);
}
void handleRootLoop() {
server.sendContent("<html><body><tt>");
int time0;
int time1;
int current;
float ftime;
int count = 0;
int maxcount = 0;
if (server.argName(0).equals("request")) {
maxcount = server.arg(0).toInt();
}
bool Keepgoing = true;
server.sendContent("time[s], altitude[m], temperature[degC], pressure[hPa]<br>");
time0 = millis(); // Get operating time in milliseconds.
time1 = time0 - interval;
while (server.client() && Keepgoing) { //client PC has connection
current = millis();
if (interval <= current - time1 ) {
time1 += interval;
ftime = (current - time0) / 1000.f;
digitalWrite(led, ledonoff = 1 - ledonoff);
float temperature = bmp280.getTemperature();
float pressure = bmp280.getPressure();
float altitude = bmp280.calcAltitude(pressure);
char chrs[128];
sprintf(chrs, "%.1f, %.1f, %.1f, %.1f<br>", ftime, altitude, temperature, pressure/100.f);
server.sendContent(chrs);
if (0 < maxcount && maxcount <= ++count) {
Keepgoing = false;
}
}
delay(2);
}
}
void setup(void) {
Serial.begin(115200);
Serial.print("\n\n\n");
WiFi.mode(WIFI_STA);
WiFi.begin(ssid, password);
// Wait for connection
int connectcount = 0;
while (WiFi.status() != WL_CONNECTED) {
if (10 <= connectcount++) ESP.restart();
Serial.print(".");
delay(500);
}
Serial.println("");
Serial.print("Connected to ");
Serial.println(ssid);
Serial.print("IP address: ");
Serial.println(WiFi.localIP());
if (MDNS.begin(servername)) {
Serial.println("MDNS responder started");
Serial.print("server name: ");
Serial.println(servername);
}
server.on("/", handleRoot);
server.on("/loop", handleRootLoop);
server.begin();
Serial.println("HTTP server started");
if (!bmp280.init()) {
Serial.println("Device bmp280 not connected or broken");
} else {
Serial.println("Device bmp280 started");
}
pinMode(led, OUTPUT);
digitalWrite(led, ledonoff); //turn LED on
}
void loop(void) {
server.handleClient();
delay(2);//allow the cpu to switch to other tasks
}
補足
「server.on("/", handleRoot);」は,ブラウザから「http://サーバ名/」というアクセスがあったら,handleRoot()を実行してね,という設定です。
通常,ブラウザには「http://サーバ名」と入力しますが,ブラウザはその後ろに「/」を加えて「http://サーバ名/」のように送信します。
「server.on("/loop", handleRootLoop);」は,ブラウザから「http://サーバ名/loop」というアクセスがあったら,handleRootLoop()を実行してね,という設定です。
handleRootLoop()内では,アクセスしてきているPCのWebブラウザが停止ボタン(X)が押されてアクセス中止されるまで,whileループでデータを1秒ごとに出力し続けます。
「http://サーバ名/loop?request=5」というアクセスでもhandleRootLoop()を実行します。
このとき,"request"はserver.argName(0)で取り出すことができ,5はserver.arg(0)で取り出せますが,これは文字列です。整数数値にしたいので,server.arg(0).toInt()として取り出します。
BMP280のオリジナルライブラリでは,BMP280操作のクラス名はBMP280です。
BMP280の初期設定を手直ししたかったので,クラスBMP280の継承クラスBMP280PPを作って,このクラスを使用しています。
説明は元記事を参照してください。≫
5 PCのWebブラウザからアクセス
Webブラウザから"http://esp32a.local/"でアクセスすると次のようにその時のデータを返します。

Webブラウザから"http://esp32a.local/loop"でアクセスすると次のように連続データを返します。
Webブラウザ上部のくるくるボタンを押すと止まります。

Webブラウザから"http://esp32a.local/loop?request=5"でアクセスすると次のように連続データを5回返します。

6 通信距離
XIAO ESP32S3のWi-Fiでの通信は約70mまで可能でした。
7 まとめ
Wi-FiマイコンXIAO ESP32S3をWebサーバとして動作させ,XIAO ESP32S3に接続された温度センサBMP280の値を,クライアントがリクエストした時から連続してデータ送信するようにしました。
パラメタ付きのアクセスの取り出し方の例も示しました。