ESP32S3 6軸センサ ICM42670Pで姿勢を検出
2026.7.6 2026.2.20 Coskx Lab
1 はじめに
6軸センサ ICM42670Pを用い,xyz3軸方向の加速度,xyz3軸周りの角速度とオイラー角(pitch,roll,yaw)を求めます。
最初に,公開されているサンプルプログラム通りのプロクラムを紹介します。(5 6軸センサ ICM42670Pを用い,オイラー角を得るプログラム)
6軸センサ値からオイラー角を算出するには,madgwickfilterを使用します。
そのままですと,センサーのゲイン誤差およびオフセット誤差を含んでしまうことがわかります。
そこで,加速度センサの較正は手間がかかるのでここでは扱いませんが,
角速度センサの較正は容易ですので,角速度センサ較正を含んだプログラムを作ります。(6 6軸センサ ICM42670Pのキャリブレーション)
このプログラムでは,角速度センサ較正を含んだラッパークラスAttitudeDetectorICM42670Coarseを使って,細かなことは隠して,プログラミングの負担を軽減しています。
2 6軸センサ ICM42670P
6軸センサ ICM42670Pは自分自身のxyz3軸方向の加速度およびxyz3軸周りの角速度を測定するセンサです。
xyz3軸方向の加速度およびxyz3軸周りの角速度から,姿勢を表すオイラー角(pitch,roll,yaw)の変換すると,センサの姿勢を表現できます。
そして,倒立振り子台車やドローンなどに取り付けると,機器の姿勢を得ることができます。
3軸加速度・3軸角速度の値から,pitch,roll,yawに変換するフィルタはいろいろあるのですが,
演算量が少なくよく使われているmadgwickfilterを使用します。このフィルタはライブラリとして公開されていますので,
そのライブラリを取り込んで使います。
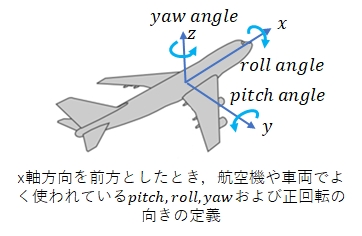
pitch,roll,yawの3つの角はいろいろな定義があるようですが,姿勢制御の場面では次のような定義が多く使われているようです。
飛行機での機首上げではpitchは正の値です。また左翼上げでrollは正の値になります。
しかし,ICM42670Pから3軸加速度・3軸角速度を受け取り,その受け取った値からmadgwickfilterライブラリで得られるpitch,roll,yawの3つの角は次のようになっています。
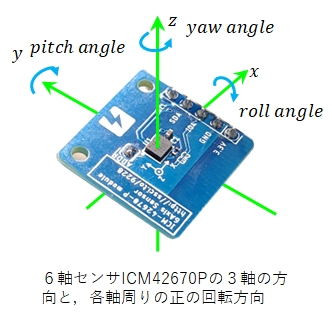
ICM42670Pのx軸方向を機器の前方と考えると,飛行機の機首上げでpitchの値が負になって符号が逆になっています。これはプログラム内で解決することにします。
なお,実際の機器にICM42670Pを取り付けたときに,ICM42670Pのy軸方向を機器の前方になってしまうこともあります。
その場合,pitchとrollが逆になりますが,これもプログラム内で解決することにします。
3 使用環境
- Windows 11 64-bit
- Arduino IDE 2.3.10
- Xiao ESP32S3
- 6軸センサ ICM42670P
- Board Package: ESP32 by Espressif Systems
- library: ICM42670P by TDK/Invensense
- library: Madgwick by Arduino
4 6軸センサ ICM42670PをxiaoESP32S3に取り付け
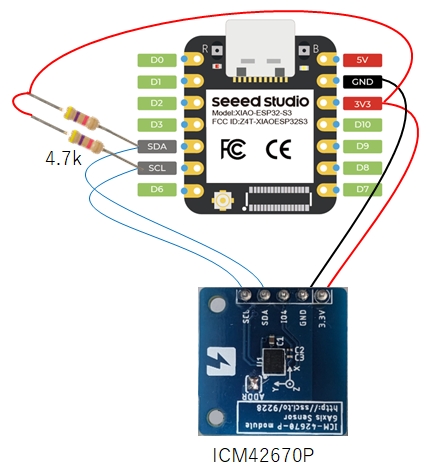
ICM42670PはI2C通信で測定値をマイコンに伝えるので,4本の線でつなぎます。
I2C通信のSDAとSCLの2つの端子はそれぞれ4.7kΩで3.3Vにプルアップしています。
このプルアップ抵抗がないと,ICM42670Pの初期化が出来ないなどの不具合が生じます。
ICM42670Pの電源は高周波の電圧変動やノイズに敏感なため,3.3V端子とGND端子間に0.1μFのセラミックコンデンサを付けます。
初期化に失敗する場合は,セラミックコンデンサを1から10μFのものに変えます。またプルアップ抵抗値を2.2kΩに変更します。
重要
ICM42670PのI2Cアドレスは,何もしなければ0x69になっています。ICM42670Pのaddrと書いてある2つのランドをはんだでショートすると,0x68になります。
この例では,はんだショートしていないので,ICM42670PのI2Cアドレスは,0x69になっています。
このアドレスは,プログラムコード上のセンサの初期化部でどちらを使っているかを設定する必要があります。
5 6軸センサ ICM42670Pを用い,オイラー角を得るプログラム
ICM42670Pの操作はICM42670Pライブラリを使用するので,ArduinoIDEのライブラリマネージャを使って先にライブラリを取り込んでおきます。
「ICM42670P」で検索すると,「ICM42670P by TDK/Invensenset」が見つかるので取り込みます。
また,madgwickfilterもライブラリを使用するので,先にライブラリを取り込んでおきます。
「madgwick」で検索すると,「madgwick by Arduino」が見つかるので取り込みます。
上記2つの準備ができたら,次のプログラムを実行できます。
なお,プログラム中,ICM42670Pから直接得られるxyz軸方向加速度とxyz軸周り角速度は,ICM42670Pの内部表現です。
この内部表現は16itの符号付き整数になっていて,初期化ICM42670P.initialize()により次のように設定された値となっています。
加速度 2G(2x9.8m/s²)のとき32768
角速度 250deg/secのとき32768
この内部表現は,変換関数convertRawAcceleration()とconvertRawGyro()によってそれぞれm/s²,deg/sec(度/秒)に変換されています。
また,madgwickから得られるpitch,roll,yawの3つの角の単位はdeg(度)です。
重要
プログラムコードでも,6軸センサ ICM42670PのI2Cアドレスについての指示が必要です。
この指示は
ICM42670 IMU_icm42670(Wire, true);
のところで行われています。ここには
ICM42670 IMU_icm42670(Wire, true); //I2Cアドレス0x69
ICM42670 IMU_icm42670(Wire, false); //I2Cアドレス0x68
のどちらかを記述します。
「3 6軸センサ ICM42670PをxiaoESP32S3に取り付け」のところで,I2Cアドレスとして0x69を使うことにしたので,
ICM42670 IMU_icm42670(Wire, true);
と記述されています。
arduinoIDEでの作業のときは次の2つのライブラリを読み込んでおいてください。
ICM42670P by TDK/Invensense
Madgwick by Arduino
6軸センサ ICM42670Pを用い,オイラー角を得るプログラム
//ICM42670P_test.ino
//library: ICM42670P by TDK/Invensense
//library: Madgwick by Arduino
#include "ICM42670P.h"
#include <MadgwickAHRS.h>
ICM42670 IMU_icm42670(Wire, true);
Madgwick madgwickfilter;
float acc_fsrange;
float gyro_fsrange;
unsigned long microsPerReading, microsPrevious;
int frequency = 200; //Hz データ取得周波数
void setup() {
int ret;
Serial.begin(115200);
//while(!Serial) {}
delay(100);
//pinMode(SDA, INPUT_PULLUP);pinMode(SCL, INPUT_PULLUP);
// These won't work. The pull-up resistor value is too high.
//After adding 4.7k pull-up resistors to the SDA and SCL pins,
// startup issues completely disappeared.
// Initializing the ICM42670
Serial.println("ICM42670 initialization started");
ret = IMU_icm42670.begin();
if (ret != 0) {
Serial.print("ICM42670 initialization failed : ");
Serial.println(ret);
while(1);
}
Serial.println("ICM42670 initialization completed");
delay(100);
// Accel ODR = 200 Hz and Full Scale Range = 2G
IMU_icm42670.startAccel(frequency,2);
acc_fsrange = 2.0f;
// Gyro ODR = 200 Hz and Full Scale Range = 250 dps
IMU_icm42670.startGyro(frequency,250);
gyro_fsrange = 250.0f;
// Wait IMU_icm42670 to start
delay(100);
madgwickfilter.begin(frequency);
microsPerReading = 1000000 / frequency; //Period measured in microseconds
microsPrevious = micros();
Serial.print("\ntime[sec], acceleration[m/s2] x,y,z,");
Serial.print(" angular_velocity[deg/s] x,y,x,");
Serial.println(" pitch[deg],roll[deg],yaw[deg]");
}
void loop() {
inv_imu_sensor_event_t imu_event;
unsigned long microsNow;
static int cntr = 0;
microsNow = micros();
if (microsNow - microsPrevious >= microsPerReading) {
//Serial.println(microsNow - microsPrevious);
microsPrevious = microsPrevious + microsPerReading;
// Get last event
IMU_icm42670.getDataFromRegisters(imu_event);
float ax = convertRawAcceleration(imu_event.accel[0]); //acceleration_x [m/s2]
float ay = convertRawAcceleration(imu_event.accel[1]); //acceleration_y [m/s2]
float az = convertRawAcceleration(imu_event.accel[2]); //acceleration_z [m/s2]
float gx = convertRawGyro(imu_event.gyro[0]); //angular_velocity_x [deg/s]
float gy = convertRawGyro(imu_event.gyro[1]); //angular_velocity_y [deg/s]
float gz = convertRawGyro(imu_event.gyro[2]); //angular_velocity_z [deg/s]
madgwickfilter.updateIMU(gx, gy, gz, ax, ay, az);
// print the heading, pitch and roll
float roll = madgwickfilter.getRoll();
float pitch = madgwickfilter.getPitch();
float yaw = madgwickfilter.getYaw() - 180.0;
cntr++;
if (cntr != frequency) return;
cntr = 0;
// Format data for Serial Plotter
Serial.print(microsNow/1000000);
Serial.print(", ");
Serial.print(ax);
Serial.print(", ");
Serial.print(ay);
Serial.print(", ");
Serial.print(az);
Serial.print(", ");
Serial.print(gx);
Serial.print(", ");
Serial.print(gy);
Serial.print(", ");
Serial.print(gz);
Serial.print(", ");
Serial.print(pitch);
Serial.print(", ");
Serial.print(roll);
Serial.print(", ");
Serial.println(yaw);
}
}
float convertRawAcceleration(int16_t aRaw) {
// since we are using acc_fsrange g range
// -2 g maps to a raw value of -32768
// +2 g maps to a raw value of 32767
float a = (aRaw * acc_fsrange) / 32768.0 * 9.8;
return a; // [m/s^2]
}
float convertRawGyro(int16_t gRaw) {
// since we are using gyro_fsrange degrees/seconds range
// -250 maps to a raw value of -32768
// +250 maps to a raw value of 32767
float g = (gRaw * gyro_fsrange) / 32768.0;
return g; // [deg/s]
}
ICM42670Pをほぼ水平に静止させ,得られた姿勢データは次のようになりました。
これは1秒間隔のデータです。
ICM42670 initialization started
ICM42670 initialization completed
time[sec], acceleration[m/s2] x,y,z, angular_velocity[deg/s] x,y,x, pitch[deg],roll[deg],yaw[deg]
1, -0.43, -0.18, 9.94, -0.38, 0.05, -0.61, 2.49, -1.10, -0.59
2, -0.44, -0.18, 9.94, -0.44, 0.05, -0.53, 2.55, -0.98, -1.14
3, -0.44, -0.17, 9.94, -0.46, 0.06, -0.60, 2.54, -0.99, -1.70
4, -0.43, -0.18, 9.96, -0.43, 0.08, -0.61, 2.53, -1.02, -2.26
5, -0.44, -0.18, 9.95, -0.38, 0.06, -0.52, 2.45, -1.15, -2.82
6, -0.43, -0.20, 9.95, -0.41, 0.12, -0.58, 2.49, -1.08, -3.38
7, -0.43, -0.19, 9.94, -0.40, 0.05, -0.69, 2.41, -1.13, -3.94
8, -0.44, -0.19, 9.95, -0.40, 0.09, -0.56, 2.53, -1.11, -4.50
9, -0.42, -0.19, 9.96, -0.44, -0.02, -0.52, 2.39, -1.01, -5.06
10, -0.43, -0.19, 9.95, -0.41, 0.06, -0.61, 2.43, -1.11, -5.62
11, -0.45, -0.19, 9.97, -0.46, 0.05, -0.63, 2.59, -1.09, -6.18
12, -0.43, -0.19, 9.95, -0.49, 0.15, -0.60, 2.46, -1.15, -6.75
13, -0.43, -0.19, 9.95, -0.46, 0.05, -0.58, 2.44, -1.10, -7.31
14, -0.45, -0.18, 9.94, -0.41, 0.09, -0.60, 2.55, -1.01, -7.87
15, -0.45, -0.18, 9.96, -0.41, 0.00, -0.64, 2.53, -1.13, -8.44
16, -0.44, -0.18, 9.96, -0.40, 0.06, -0.61, 2.54, -0.97, -9.00
17, -0.44, -0.19, 9.95, -0.41, 0.08, -0.60, 2.54, -1.03, -9.56
18, -0.42, -0.19, 9.97, -0.41, 0.06, -0.61, 2.40, -1.09, -10.11
19, -0.42, -0.19, 9.95, -0.46, 0.08, -0.52, 2.33, -1.11, -10.67
20, -0.43, -0.18, 9.96, -0.41, 0.06, -0.63, 2.46, -1.03, -11.23
21, -0.43, -0.18, 9.97, -0.43, 0.09, -0.56, 2.42, -1.01, -11.79
22, -0.44, -0.19, 9.95, -0.44, 0.05, -0.64, 2.52, -1.05, -12.35
23, -0.43, -0.19, 9.96, -0.38, 0.08, -0.56, 2.55, -1.06, -12.92
センサをほぼ水平の置いている状態で,Accelのz(鉛直方向の)加速度が9.9m/s2程度を示していますが,9.8m/s2であって欲しいです。
gainまたはoffsetに誤差があるようですが,これは放置します。
センサをほぼ水平の置いている状態で,pitchとrollは正しく測定出来ているかどうかは検証できませんが,0度近いので良いことにします。
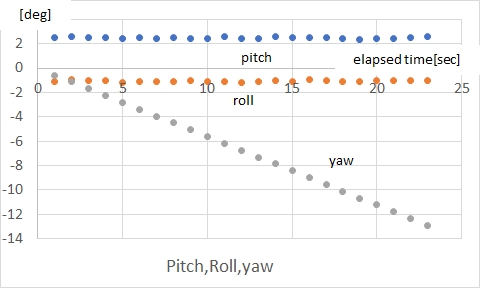
yawは最初に0度ですが毎秒0.5度程度ずれていきます。
Gyro(x,y,z軸周りの角速度[deg/s])データは,センサが静止しているため,0deg/sのはずですが,0.5deg/s程度のoffsetがあるようです。
得られたpith,roll,yawの取得値をグラフにしてみました。
6 6軸センサ ICM42670Pのキャリブレーション
ICM42670PのGyro(x,y,z軸周りの角速度[deg/s])の出力はセンサ静止状態では0のはずなので,センサGyro出力に見えている値はoffset誤差と考えられます。
そこで。センサ静止状態で200個ほどGyro出力を取得し,その平均値をoffset誤差と考え,キャリブレーションしたことにして,本番の測定値でoffset誤差を引いて,測定値とすることにしました。
Madgwickを含み,クラスICM42670Pにキャリブレーションとoffset誤差修正機能を持たせた,ラッパークラスAttitudeDetectorICM42670Coarseを使います。
キャリブレーションとoffset誤差修正機能はラッパークラスAttitudeDetectorICM42670Coarse内に隠されているので,ラッパークラスプログラムコードで確認してください。(キャリブレーションは関数start()内で行われています)
測定メソッドの呼び出しは
Attitude_Detector.getAttitude(ax, ay, az, gx, gy, gz, pitch, roll, yaw);
で行われており,ax, ay, azが3軸の加速度[m/s2],gx, gy, gzが3軸周りの角速度[deg/sec],pitch, roll, yawがオイラー角[deg]になっています。
ラッパークラスAttitudeDetectorICM42670Coarseに対応するファイル(AttitudeDetectorICM42670Coarse.h, AttitudeDetectorICM42670Coarse.cpp)
はzipファイルになっているので,ダウンロードして作業フォルダに入れてください。
zipファイルのダウンロード
6軸センサ ICM42670Pのキャリブレーション付のプログラム
//ICM42670P_test_withCoarseCal.ino
//library: ICM42670P by TDK/Invensense
//library: Madgwick by Arduino
#include <AttitudeDetectorICM42670Coarse.h>
int frequency = 200; //Hz データ取得周波数
AttitudeDetectorICM42670Coarse Attitude_Detector(Wire, true);
unsigned long microsPerReading, microsPrevious;
void setup() {
int ret;
Serial.begin(115200);
//while(!Serial) {}
delay(100);
// Initializing the AttitudeDetectorICM42670P with calibration
Attitude_Detector.start(frequency, true);
// Initializing the AttitudeDetectorICM42670P with gyroz compensation values
//Attitude_Detector.start(frequency, -65, 6, -89);
microsPerReading = 1000000 / frequency; //Period measured in microseconds
microsPrevious = micros() - microsPerReading;
Serial.print("\ntime[sec], acceleration[m/s2] x,y,z,");
Serial.print(" angular_velocity[deg/s] x,y,x,");
Serial.println(" pitch[deg],roll[deg],yaw[deg]");
}
void loop() {
float ax, ay, az, gx, gy, gz;
float pitch, roll, yaw;
unsigned long microsNow;
static int cntr = 0;
microsNow = micros();
if (microsNow - microsPrevious >= microsPerReading) {
//Serial.println(microsNow - microsPrevious);
microsPrevious = microsPrevious + microsPerReading;
// Get last event
Attitude_Detector.getAttitude(ax, ay, az, gx, gy, gz, pitch, roll, yaw);
cntr++;
if (cntr != frequency) return;
cntr = 0;
// Format data for Serial Plotter
Serial.print(microsNow/1000000);
Serial.print(", ");
Serial.print(ax);
Serial.print(", ");
Serial.print(ay);
Serial.print(", ");
Serial.print(az);
Serial.print(", ");
Serial.print(gx);
Serial.print(", ");
Serial.print(gy);
Serial.print(", ");
Serial.print(gz);
Serial.print(", ");
Serial.print(pitch);
Serial.print(", ");
Serial.print(roll);
Serial.print(", ");
Serial.println(yaw);
}
}
次のような実行結果が得られました。
3軸の角速度センサのキャリブレーションはセンサ静止状態で行います。
また測定もセンサ静止状態で行っています。そのため,pitch, roll, yawのオイラー角[deg]はすべて0になって欲しいところです。実際にはセンサの保持の仕方でpitch, rollは0にはなりませんが一定値を保つはずです。
測定値は1秒間隔で表示しています。
ICM42670 initialization started
ICM42670 initialization completed
ICM42670 calibration started.
It will take 5 seconds.
calibrateGyro<....................>
gyroc : -65 6 -89
ICM42670 calibration completed.
time[sec], acceleration[m/s2] x,y,z, angular_velocity[deg/s] x,y,x, pitch[deg],roll[deg],yaw[deg]
7, 0.72, -0.13, 9.92, 0.04, 0.02, 0.05, -4.17, -0.74, 0.03
8, 0.72, -0.12, 9.91, -0.04, 0.00, 0.04, -4.20, -0.69, 0.02
9, 0.73, -0.12, 9.92, -0.02, -0.03, 0.07, -4.18, -0.78, 0.02
10, 0.73, -0.13, 9.93, -0.04, 0.03, 0.05, -4.13, -0.76, 0.01
11, 0.73, -0.13, 9.92, -0.02, 0.02, 0.04, -4.20, -0.74, 0.01
12, 0.73, -0.12, 9.92, 0.02, -0.03, -0.01, -4.21, -0.74, 0.01
13, 0.72, -0.12, 9.91, -0.04, 0.02, 0.01, -4.13, -0.78, 0.02
14, 0.72, -0.12, 9.92, -0.02, 0.06, -0.08, -4.13, -0.76, 0.02
15, 0.72, -0.12, 9.91, 0.02, 0.06, -0.05, -4.18, -0.62, 0.02
16, 0.73, -0.13, 9.92, -0.01, 0.02, 0.08, -4.21, -0.77, 0.03
17, 0.72, -0.12, 9.90, -0.01, 0.06, -0.05, -4.05, -0.66, 0.03
18, 0.72, -0.12, 9.93, -0.04, -0.05, 0.02, -4.07, -0.69, 0.04
19, 0.72, -0.12, 9.91, 0.02, 0.03, 0.05, -4.22, -0.63, 0.04
20, 0.72, -0.12, 9.92, 0.02, 0.00, 0.02, -4.18, -0.76, 0.05
21, 0.72, -0.13, 9.92, 0.02, -0.03, -0.02, -4.09, -0.80, 0.05
22, 0.71, -0.11, 9.91, -0.02, 0.02, 0.02, -4.05, -0.64, 0.04
23, 0.72, -0.12, 9.91, -0.02, 0.02, 0.04, -4.21, -0.65, 0.04
24, 0.72, -0.12, 9.94, 0.04, 0.05, 0.05, -4.17, -0.72, 0.05
25, 0.72, -0.12, 9.92, 0.04, 0.00, -0.02, -4.15, -0.73, 0.04
26, 0.71, -0.12, 9.94, 0.04, 0.00, 0.05, -4.12, -0.61, 0.03
27, 0.72, -0.12, 9.93, -0.08, 0.00, 0.04, -4.18, -0.67, 0.03
28, 0.72, -0.13, 9.91, -0.02, 0.02, 0.02, -4.21, -0.72, 0.04
29, 0.72, -0.12, 9.93, -0.07, -0.02, -0.02, -4.13, -0.67, 0.04
30, 0.72, -0.11, 9.93, 0.02, 0.03, -0.02, -4.18, -0.63, 0.04
31, 0.72, -0.11, 9.93, 0.04, 0.06, -0.04, -4.12, -0.58, 0.03
32, 0.72, -0.11, 9.93, -0.05, 0.03, 0.02, -4.08, -0.63, 0.03
33, 0.72, -0.12, 9.93, -0.07, -0.02, 0.04, -4.07, -0.67, 0.03
34, 0.72, -0.11, 9.91, -0.08, -0.02, -0.04, -4.19, -0.61, 0.03
35, 0.73, -0.12, 9.91, 0.01, -0.03, 0.07, -4.24, -0.71, 0.04
36, 0.72, -0.12, 9.91, 0.02, -0.03, 0.01, -4.19, -0.63, 0.03
37, 0.72, -0.11, 9.91, -0.02, 0.03, -0.04, -4.17, -0.69, 0.04
38, 0.72, -0.13, 9.92, 0.01, 0.05, -0.05, -4.16, -0.79, 0.05
39, 0.72, -0.11, 9.92, -0.04, 0.06, 0.05, -4.14, -0.66, 0.04
40, 0.72, -0.12, 9.92, 0.07, 0.00, 0.01, -4.18, -0.80, 0.05
41, 0.71, -0.12, 9.92, 0.01, -0.09, -0.02, -4.16, -0.67, 0.04
42, 0.73, -0.11, 9.92, 0.07, 0.09, -0.02, -4.22, -0.64, 0.04
43, 0.72, -0.12, 9.93, 0.02, -0.02, 0.01, -4.15, -0.66, 0.04
44, 0.72, -0.12, 9.93, 0.05, 0.03, -0.04, -4.16, -0.80, 0.05
45, 0.73, -0.11, 9.93, 0.05, 0.02, -0.08, -4.21, -0.63, 0.03
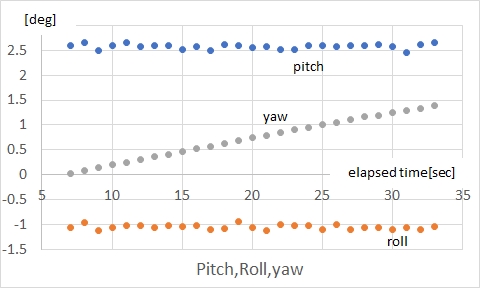
Gyroに関するoffsetの値を修正して,yawの値に関してはほとんど0で誤差がほとんどなくなりました。
pitch,rollに関してはセンサの置き方の影響と,accに関する取得値のoffset誤差が不明なので,0になっていませんが,ほとんど一定値を保っています。
yawの値に関してはキャリブレーション前と比べるとずいぶん良くなっていると思います。
Gyroのoffsetの適正な補正値は,センサの稼働時間や温度によって変化するので,センサをしばらく使用してから,Gyroのoffsetの補正を行うのが良いようです。
pith,roll,yawの取得値をグラフにしてみました。
7 動作周波数に関して考察
上記デモプログラムでは,ICM42670およびmadgwickfilterを周波数200Hzで動作させていました。
int frequency = 200; //Hz データ取得周波数
ここを
int frequency = 100; //Hz データ取得周波数
int frequency = 800; //Hz データ取得周波数
に変更してyawの値に注目して動作を確認しました。
どの周波数においても,キャリブレーション後センサ静止のままで使用したとき,yawの値は同様に0付近を保っていました。
ところが,センサを水平面で反時計回りに90度回転してみたところ,100Hzと200Hzのときは,およそ90度を表示しましたが,
800Hzのときは,80度付近にしかなりませんでした。
高い周波数ほど,yawの誤差蓄積は速いと感じました。
実用では,100Hz,200Hzくらいが良いようです。
8 まとめ
Xiao ESP32S3で,6軸センサICM42670Pおよびmadgwickfilterを用いて,機器の姿勢を得ました。
その際,ICM42670PのGyroに関するoffset誤差をあらかじめ求めておくと,より安定したGyro値を得ることができることがわかりました。
offset誤差をキャリブレーションで修正する機構を内蔵したラッパークラスAttitudeDetectorICM42670Coarseを作成し,デモプログラムでその有効性を確かめました。
デモプログラムはテストのため動作周波数200Hzの動作になっており満足のいく結果を得ています。
ICM42670Pはデータシートによれば1msec間隔動作が可能ですので,各データに関してはより短い周期でデータ採取して時間軸平滑化フィルタを使うなどの工夫検討されますが,
yawに関してはそのような検討は無意味のようです。
付録
BLE-UART通信を使ってICM42670を操作
A1 はじめに
スマートフォンなどからBLE-UART通信を使ってICM42670を操作する例をここで扱うことにします。
主要作業をラッパークラスにまとめているので,メインプログラムコードをコンパクトにしています。
なお,このプログラムは,一般的な無線リモコンの動作をBLE-UART通信で行うプログラムのひな型でもあります。
使用しているクラスは,本論中で扱った「AttitudeDetectorICM42670Coarse」と,BLE-UART通信の「Handy_BLE_Uart」です。
BLE-UART通信と「Handy_BLE_Uart」に関しては次を参照してください。
BLE Uart通信
プログラム起動時にはICM42670のキャリブレーションは行わず,
スマホやPCの通信ターミナルアプリからBLE-UART通信でコマンドを与えてキャリブレーションを行うことにします。
またICM42670から得られたデータの表示指示コマンドもBLE-UART通信で与えます。
コマンドはプログラムコード作成時に割り当てを決めておきます。
ここでは次の4つのコマンドを使います。
cal:キャリブレーション実行
acc:ICM42670から得られた加速度を通信ターミナルに連続表示
agv:ICM42670から得られた角速度を通信ターミナルに連続表示
eul:ICM42670から得られたオイラー角を通信ターミナルに連続表示
stp:連続表示の中止
ラッパークラスAttitudeDetectorICM42670CoarseはAttitudeDetectorICM42670Coarse.hとAttitudeDetectorICM42670Coarse.cppの2つのファイルで定義されています。
ラッパークラスHandy_BLE_UartはHandy_BLE_Uart.hとHandy_BLE_Uart.cppの2つのファイルで定義されています。
メインプログラムを含む5つのファイルの入ったzipファイルを次からダウンロードしてください。
zipファイルのダウンロード
A2 プログラムコード
ダウンロードした5つのファイルを作業フォルダに入れてください。
6軸センサ ICM42670PをBLE-UART通信で制御するメインプログラムコード
//ICM42670P_test_withCoarseCal.ino
//library: ICM42670P by TDK/Invensense
//library: Madgwick by Arduino
//Command assign
// 'cal': execute calibration.
// 'acc': measure accelerations and transmit them.
// 'agv': measure angular velocities and transmit them.
// 'eul': measure Euler angles and transmit them.
// 'stp': stop measurement and transmission.
#include <AttitudeDetectorICM42670Coarse.h>
#include <Handy_BLE_Uart.h>
#define DEVICENAME "ADetTest"
uint32_t frequency = 200; //Hz 姿勢データ取得周波数
AttitudeDetectorICM42670Coarse Attitude_Detector(Wire, true);//defaultではtrue
Handy_BLE_Uart bleuart;
enum class ERequest {
non,
cal,
acc,
agv,
eul
};
unsigned long microsPerReading, microsPrevious;
ERequest request = ERequest::non;
void setup() {
int ret;
Serial.begin(115200);
delay(300);
//*** initialize BLE ***
bleuart.setCallbackFunc(StringReceptionReport);
bleuart.setInitialMessage("ICM42670P_CoarseCal_BLECMD\n Send me 'cal', 'acc', 'agv', 'eul', or 'stp'");
//bleuart.begin(DEVICENAME, 123456); //uses passkey 123456
bleuart.begin(DEVICENAME); //without passkey
while (!bleuart.isConnected()) delay(100);
delay(1000);
//*** initialize Attitude_Detector ***
Attitude_Detector.start(frequency, -65, 6, -89);
microsPerReading = 1000000 / frequency; //Period measured in microseconds
microsPrevious = micros() - microsPerReading;
Serial.println("end of setup");
bleuart.transferString("end of setup");
}
void loop() {
float ax, ay, az, gx, gy, gz; //acceleration xyz, angular velocity xyz
float pitch, roll, yaw;
unsigned long microsNow, microsDifference;
static int cntr = 0;
if (request == ERequest::non) {
//Serial.println("request == ERequest::non");
delay(10);
return;
}
if (request == ERequest::cal) {
request = ERequest::non;
executeCalibration();
return;
}
microsNow = micros();
microsDifference = microsNow - microsPrevious;
if (microsDifference >= microsPerReading) {
if (microsDifference > microsPerReading * 1.5) {
microsPrevious = microsNow;
} else {
microsPrevious = microsPrevious + microsPerReading;
}
//Must be executed at the frequency.
Attitude_Detector.getAttitude(ax, ay, az, gx, gy, gz, pitch, roll, yaw);
cntr++;
if (cntr != frequency) return;
cntr = 0;
String MeasuredValue;
if (request == ERequest::acc) {
MeasuredValue = String(ax) + ", " + String(ay) + ", " + String(az);
} else if (request == ERequest::agv) {
MeasuredValue = String(gx) + ", " + String(gy) + ", " + String(gz);
} else if (request == ERequest::eul) {
MeasuredValue = String(pitch) + ", " + String(roll) + ", " + String(yaw);
}
bleuart.transferString(MeasuredValue);
}
}
void StringReceptionReport(String str) {
Serial.println("RX_Value = " + str);
//開発初期の確認用エコーバック 不要になったらコメントアウトして送信を減らす
bleuart.transferString(str);
if (str.indexOf("cal") == 0) request = ERequest::cal;
else if (str.indexOf("acc") == 0) request = ERequest::acc;
else if (str.indexOf("agv") == 0) request = ERequest::agv;
else if (str.indexOf("eul") == 0) request = ERequest::eul;
else if (str.indexOf("stp") == 0) request = ERequest::non;
}
void executeCalibration()
{
Serial.println("Received your calibration request.");
Serial.println("Keep the sensor motionless.");
bleuart.transferString("Received your calibration request.");
bleuart.transferString("Keep the sensor motionless.");
Attitude_Detector.calibrateGyro();
int16_t gxc, gyc, gzc;
Attitude_Detector.getGyrOffset(gxc, gyc, gzc);
String result = "calibration value " + String(gxc) + ", " + String(gyc) + ", " + String(gzc);
bleuart.transferString(result);
Serial.println("Calibration has done.");
bleuart.transferString("Calibration has done.");
}
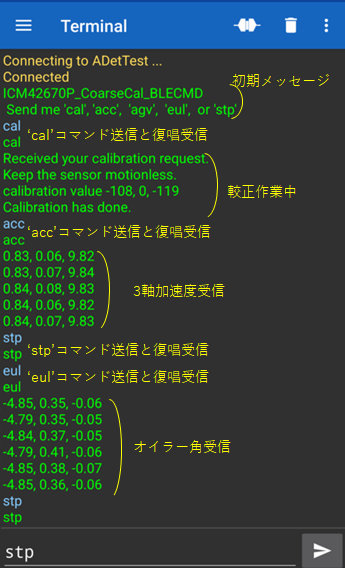
A3 実行の様子
Androidスマホの「Serial Bluetooth Terminal」の画面
接続後,calコマンドで較正を行い,その後accコマンドで3軸加速度を表示させ,eulコマンドでオイラー角を表示させています。