ESP32S3 6軸センサ MPU6050でセンサの姿勢を検出
2027.7.26 Coskx Lab
1 はじめに
6軸センサ MPU6050は自分自身のxyz3軸方向の加速度およびxyz3軸周りの角速度を測定するセンサです。
xyz3軸方向の加速度およびxyz3軸周りの角速度から,姿勢を表すオイラー角(pitch,roll,yaw)の変換すると,センサの姿勢を表現できます。
そして,倒立振り子台車やドローンなどに取り付けると,機器の姿勢を得ることができます。
3軸加速度・3軸角速度の値から,pitch,roll,yawに変換するフィルタはいろいろあるのですが,
演算量が少なくよく使われているmadgwickfilterを使用します。このフィルタはライブラリとして公開されていますので,
そのライブラリを取り込んで使います。
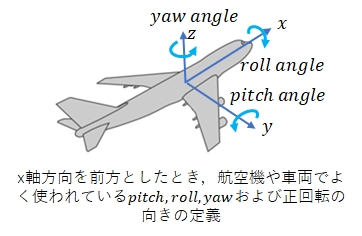
pitch,roll,yawの3つの角はいろいろな定義があるようですが,姿勢制御の場面では次のような定義が多く使われているようです。
飛行機での機首上げではpitchは正の値です。また左翼上げでrollは正の値になります。
しかし,MPU6050から3軸加速度・3軸角速度を受け取り,その受け取った値からmadgwickfilterライブラリで得られるpitch,roll,yawの3つの角は次のようになっています。

MPU6050のx軸方向を機器の前方と考えると,飛行機の機首上げでpitchの値が負になって符号が逆になっています。これはプログラム内で解決することにします。
なお,実際の機器にMPU6050を取り付けたときに,MPU6050のy軸方向を機器の前方になってしまうこともあります。
その場合,pitchとrollが逆になりますが,これもプログラム内で解決することにします。
2 使用環境
- Windows 11 64-bit
- Arduino IDE 2.3.6
- Xiao ESP32S3
- 6軸センサ MPU6050
3 6軸センサ MPU6050をxiaoESP32S3に取り付け
MPU6050はI2C通信で測定値をマイコンに伝えるので,4本の線でつなぎます。

4 6軸センサ MPU6050を用い,オイラー角を得るプログラム
MPU6050の操作はMPU6050ライブラリを使用するので,ArduinoIDEのライブラリマネージャを使って先にライブラリを取り込んでおきます。
「MPU6050」で検索すると,「MPU6050 by Electronic cat」が見つかるので取り込みます。
また,madgwickfilterもライブラリを使用するので,先にライブラリを取り込んでおきます。
「madgwick」で検索すると,「madgwick by Arduino」が見つかるので取り込みます。
上記2つの準備ができたら,次のプログラムを実行できます。
なお,プログラム中,MPU6050から直接得られるxyz軸方向加速度とxyz軸周り角速度は,mpu6050の内部表現です。
この内部表現は16itの符号付き整数になっていて,初期化mpu6050.initialize()により次のように設定された値となっています。
加速度 2G(2x9.8m/s²)のとき32768
角速度 250deg/secのとき32768
この内部表現は,変換関数convertRawAcceleration()とconvertRawGyro()によってそれぞれm/s²,deg/sec(度/秒)に変換されています。
また,madgwickから得られるpitch,roll,yawの3つの角の単位はdeg(度)です。
6軸センサ MPU6050を用い,オイラー角を得るプログラム
//mpu6050_madgwickfilter_DEMO_0.ino//
#include <MPU6050.h>
#include <MadgwickAHRS.h>
MPU6050 mpu6050;
Madgwick madgwickfilter;
unsigned long loopperiod = 1000000; //[microsec] (1sec)
int loopfrequency = 1000000 / loopperiod; //[Hz] (1Hz)
unsigned long previoustime; //[microsec]
void setup(void) {
Wire.begin();
Serial.begin(115200);
delay(500);
Serial.println("MPU6050 & madgwickfilter test!");
mpu6050.initialize();//I2Cデバイスの初期化
delay(300);
madgwickfilter.begin(loopfrequency);
// initialize variables to pace updates to correct rate
previoustime = micros();
}
void loop() {
long currenttime = micros(); //[us]
long timediff = currenttime - previoustime; //[us]
if (loopperiod <= timediff) {
previoustime = currenttime;
int16_t ax, ay, az;//加速度 int16_tは2バイトの符号付き整数
int16_t gx, gy, gz;//角速度 同上
mpu6050.getMotion6(&ax, &ay, &az, &amp;gx, &amp;gy, &amp;amp;gz);
// convert from raw data to m/s2 and degrees/second units
float fax = convertRawAcceleration(ax); //[m/s2]
float fay = convertRawAcceleration(ay); //[m/s2]
float faz = convertRawAcceleration(az); //[m/s2]
float fgx = convertRawGyro(gx); //[deg/sec]
float fgy = convertRawGyro(gy); //[deg/sec]
float fgz = convertRawGyro(gz); //[deg/sec]
// update the filter, which computes orientation
// ACC: m/s2 Gyro: deg/sec
madgwickfilter.updateIMU(fgx, fgy, fgz, fax, fay, faz);
float pitch = madgwickfilter.getPitch(); //[deg]
float roll = madgwickfilter.getRoll(); //[deg]
float yaw = madgwickfilter.getYaw(); //[deg]
String str;
String n=", ";
str = "pitch,roll,yaw = " + String(pitch,2) + n + String(roll,2) + n + String(yaw,2);
Serial.println(str);
/*
str = "ax ay az gx gy gz pitch roll yaw= " + String(fax,2) + n + String(fay,2) + n + String(faz,2)
+ n + String(fgx,2) + n + String(fgy,2) + n + String(fgz,2)
+ n + String(pitch,2) + n + String(roll,2) + n + String(yaw,2);
Serial.println(str);
*/
}
}
float convertRawAcceleration(int16_t aRaw) {
// in default initializaton FullScaleAccelRange is set to 2.0
const float rate = 2.0 / 32768.0 * 9.8;
float a = aRaw * rate;
return a; // [m/s^2]
}
float convertRawGyro(int16_t gRaw) {
// in default initializaton FullScaleGyroRange is set to 250.0
const float rate = 250.0 / 32768.0;
float g = gRaw * rate;
return g; // [deg/s]
}
MPU6050を最初は水平に静止させ,その後手で各軸周りに傾けながら,得られた姿勢データをグラフにして次のような様子が得られました。
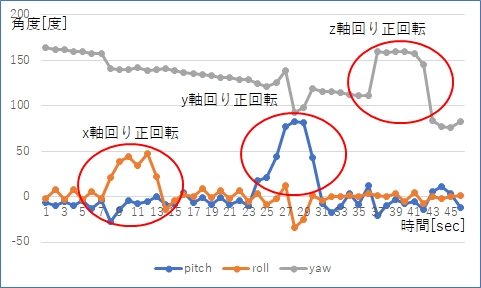
MPU6050をMPU6050の座標系で各軸周り正方向に傾けたときに,pitch,roll,yawの値が正の方向に変化していることがわかります。
yawは水平面内での回転を表しますが,初期値は180度になっています。しかしその後何もしていないのにほぼ一定の割合で値が下がっています。
pitchとrollは重力加速度のおかげで,加速度データと角速度データで修正しながら,フィルタ内で計算されているのですが,水平面内の角度は角速度の積分のみで算出されているため,z軸周りの角速度のoffset(定値誤差)が積もって加算されているためと思われます。
実際にはMPU6050の6軸すべての値にoffsetがあります。センサ出荷時にoffsetの値を修正するための定数がセンサ内に保存され,それが使用されています。しかしまだ十分ではないようです。キャリブレーションが必要なようです。
なお,センサを静止させたまま得られたデータにおいて,pitch,rollの標準偏差は4度程度ありまして,結構大きいと感じました。
5 6軸センサ MPU6050のキャリブレーション
MPU8060の公式資料にはキャリブレーションにつての資料はありませんが,いろいろ解析した方がいらっしゃったようで,MPU6050ライブラリにはキャリブレーション用の関数が含まれていますので,それを利用しようと思います。
キャリブレーションプログラムを実行するときには,MPU6050を水平に置き,静止させ,振動もできるだけ無いようにします。
6軸センサ MPU6050のキャリブレーションプログラム
//mpu6050calibration.ino//
#include <MPU6050.h>
MPU6050 mpu6050;
void setup(void) {
Wire.begin();
Serial.begin(115200);
delay(1000);
Serial.println();
Serial.println("MPU6050 calibration");
mpu6050.initialize();//I2Cデバイスの初期化
delay(300);
calibrateMPU();
}
void calibrateMPU() {
Serial.println("before Calibration");
showCompensation();
Serial.println();
Serial.println("Calibrating Gyro Accel");
mpu6050.CalibrateGyro();
mpu6050.CalibrateAccel();
Serial.println();
Serial.println("Calibration has finished");
Serial.println("after Calibration");
showCompensation();
Serial.println();
}
void showCompensation() {
int8_t gyoTCxoffset = mpu6050.getXGyroOffsetTC();
int8_t gyoTCyoffset = mpu6050.getYGyroOffsetTC();
int8_t gyoTCzoffset = mpu6050.getZGyroOffsetTC();
int8_t FinexGain = mpu6050.getXFineGain();
int8_t FineyGain = mpu6050.getYFineGain();
int8_t FinezGain = mpu6050.getZFineGain();
int16_t AccxOffset = mpu6050.getXAccelOffset();
int16_t AccyOffset = mpu6050.getYAccelOffset();
int16_t AcczOffset = mpu6050.getZAccelOffset();
int16_t GyroxOffset = mpu6050.getXGyroOffset();
int16_t GyroyOffset = mpu6050.getYGyroOffset();
int16_t GyrozOffset = mpu6050.getZGyroOffset();
char str1[128];
sprintf(str1, "gyoTCoffset(x,y,z) = %6d, %6d, %6d", gyoTCxoffset, gyoTCyoffset, gyoTCzoffset);
Serial.println(str1);
sprintf(str1, "FineGain(x,y,z) = %6d, %6d, %6d", FinexGain, FineyGain, FinezGain);
Serial.println(str1);
sprintf(str1, "AccOffset(x,y,z) = %6d, %6d, %6d", AccxOffset, AccyOffset, AcczOffset);
Serial.println(str1);
sprintf(str1, "GyroOffset(x,y,z) = %6d, %6d, %6d", GyroxOffset, GyroyOffset, GyrozOffset);
Serial.println(str1);
}
void loop() {
}
次のような実行結果が得られました。
MPU6050 calibration
gyoTCoffset(x,y,z) = 34, 38, 50
FineGain(x,y,z) = 7, -84, 3
AccOffset(x,y,z) = 5122, 5652, 9328
GyroOffset(x,y,z) = 0, 0, 0
Calibrating Gyro Accel
>...............>*...............
Calibration has finished
after Calibration
gyoTCoffset(x,y,z) = 34, 38, 50
FineGain(x,y,z) = 7, -84, 3
AccOffset(x,y,z) = 5062, 5626, 11364
GyroOffset(x,y,z) = 24, 9, 35
実行結果のgyoTCoffsetとFineGainは,それぞれ温度に関する補正値,加速度センサに関する補正値のようです。しかし,キャリブレーションによって値は変化しないので,出荷時のまま手を付けないことにします。
AccOffsetは加速度センサのoffsetのようです。一度キャリブレーションすると,その値はMPU6050内に保存されるようで,何回キャリブレーションしてもあまり変化しません。
GyroOffsetは角速度センサのようです。一度キャリブレーションすると,その値はMPU6050内に保存されるようで,何回キャリブレーションしてもあまり変化しません。ただし,この値だけは電源再投入時に0に戻ってしまいます。
そうしますと,MPU6050を使用するプログラムにおいては,起動ごとにジャイロのキャリブレーションを行うか,何回かキャリブレーションを実行して,得られたGyroOffsetの値の確からしい値をプログラム起動時に書き込むのが良いと思います。
6 offset修正後の6軸センサ MPU6050を用い,オイラー角を得るプログラム
「4」ではMPU6050+madgwickfilterから得られるyawに,MPU6050のoffsetの影響が大きく現れてきました。そこで,「5」で得られたoffset値をプログラム起動時に書き換えることによって,yawの取得への影響をみたいと思います。
プログラムのsetup()中の
setMPUoffset();
がoffset値を書き換えているところです。
//mpu6050_madgwickfilter_DEMO.ino//
#include <MPU6050.h>
#include <MadgwickAHRS.h>
MPU6050 mpu6050;
Madgwick madgwickfilter;
unsigned long loopperiod = 1000000; //[microsec] (1sec)
int loopfrequency = 1000000 / loopperiod; //[Hz] (1Hz)
unsigned long previoustime; //[microsec]
void setup(void) {
Wire.begin();
Serial.begin(115200);
delay(500);
Serial.println("MPU6050 & madgwickfilter test!");
mpu6050.initialize();//I2Cデバイスの初期化
delay(300);
setMPUoffset();
madgwickfilter.begin(loopfrequency);
// initialize variables to pace updates to correct rate
previoustime = micros();
}
void setMPUoffset() {
Serial.println("before rewrite");
showCompensation();
// ***** MPU個体差依存 Calibrayion後の値をここに記述 *****
//MPU6050-1
//int AccOffsets[3] = {5062, 5626, 11364}; //ここの値は使用中のMPU6050に対応した値に書き換える
int GyroOffsets[3] = {24, 9, 35}; //ここの値は使用中のMPU6050に対応した値に書き換える
// ******************************************************
//setAccOffsets(AccOffsets[0], AccOffsets[1], AccOffsets[2]);
setGyroOffsets(GyroOffsets[0], GyroOffsets[1], GyroOffsets[2]);
Serial.println("after rewrite");
showCompensation();
Serial.println();
}
void showCompensation() {
int8_t gyoTCxoffset = mpu6050.getXGyroOffsetTC();
int8_t gyoTCyoffset = mpu6050.getYGyroOffsetTC();
int8_t gyoTCzoffset = mpu6050.getZGyroOffsetTC();
int8_t FinexGain = mpu6050.getXFineGain();
int8_t FineyGain = mpu6050.getYFineGain();
int8_t FinezGain = mpu6050.getZFineGain();
int16_t AccxOffset = mpu6050.getXAccelOffset();
int16_t AccyOffset = mpu6050.getYAccelOffset();
int16_t AcczOffset = mpu6050.getZAccelOffset();
int16_t GyroxOffset = mpu6050.getXGyroOffset();
int16_t GyroyOffset = mpu6050.getYGyroOffset();
int16_t GyrozOffset = mpu6050.getZGyroOffset();
char str1[128];
sprintf(str1, "gyoTCoffset(x,y,z) = %6d, %6d, %6d", gyoTCxoffset, gyoTCyoffset, gyoTCzoffset);
Serial.println(str1);
sprintf(str1, "FineGain(x,y,z) = %6d, %6d, %6d", FinexGain, FineyGain, FinezGain);
Serial.println(str1);
sprintf(str1, "AccOffset(x,y,z) = %6d, %6d, %6d", AccxOffset, AccyOffset, AcczOffset);
Serial.println(str1);
sprintf(str1, "GyroOffset(x,y,z) = %6d, %6d, %6d", GyroxOffset, GyroyOffset, GyrozOffset);
Serial.println(str1);
}
void setAccOffsets(int16_t x, int16_t y, int16_t z) {
mpu6050.setXAccelOffset(x);
mpu6050.setYAccelOffset(y);
mpu6050.setZAccelOffset(z);
}
void setGyroOffsets(int16_t x, int16_t y, int16_t z) {
mpu6050.setXGyroOffset(x);
mpu6050.setYGyroOffset(y);
mpu6050.setZGyroOffset(z);
}
void loop() {
#ifndef CALIBRATION
long currenttime = micros(); //[us]
long timediff = currenttime - previoustime; //[us]
if (loopperiod <= timediff) {
previoustime = currenttime;
int16_t ax, ay, az;//加速度 int16_tは2バイトの符号付き整数
int16_t gx, gy, gz;//角速度 同上
mpu6050.getMotion6(&ax, &ay, &az, &amp;gx, &amp;gy, &amp;amp;gz);
// convert from raw data to m/s2 and degrees/second units
float fax = convertRawAcceleration(ax); //[m/s2]
float fay = convertRawAcceleration(ay); //[m/s2]
float faz = convertRawAcceleration(az); //[m/s2]
float fgx = convertRawGyro(gx); //[deg/sec]
float fgy = convertRawGyro(gy); //[deg/sec]
float fgz = convertRawGyro(gz); //[deg/sec]
// update the filter, which computes orientation
// ACC: m/s2 Gyro: deg/sec
madgwickfilter.updateIMU(fgx, fgy, fgz, fax, fay, faz);
float pitch = madgwickfilter.getPitch(); //[deg]
float roll = madgwickfilter.getRoll(); //[deg]
float yaw = madgwickfilter.getYaw(); //[deg]
String str;
String n=", ";
str = "pitch,roll,yaw = " + String(pitch,2) + n + String(roll,2) + n + String(yaw,2);
Serial.println(str);
/*
str = "ax ay az gx gy gz pitch roll yaw= " + String(fax,2) + n + String(fay,2) + n + String(faz,2)
+ n + String(fgx,2) + n + String(fgy,2) + n + String(fgz,2)
+ n + String(pitch,2) + n + String(roll,2) + n + String(yaw,2);
Serial.println(str);
*/
}
#endif
}
float convertRawAcceleration(int16_t aRaw) {
// in default initializaton FullScaleAccelRange is set to 2.0
const float rate = 2.0 / 32768.0 * 9.8;
float a = aRaw * rate;
return a; // [m/s^2]
}
float convertRawGyro(int16_t gRaw) {
// in default initializaton FullScaleGyroRange is set to 250.0
const float rate = 250.0 / 32768.0;
float g = gRaw * rate;
return g; // [deg/s]
}
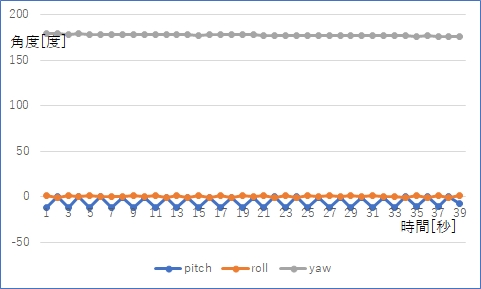
その結果,次のグラフのようにMPU6050静止時のyawがかなり安定した値として得られるようになりました。
7 まとめ
Xiao ESP32S3で,6軸センサMPU6050およびmadgwickfilterを用いて,機器の姿勢を得ました。
その際,MPU6050もoffsetを較正するとより安定した値を得ることができることがわかりました。
なお,得られるpitch,rollも結構ノイズが載っていて,標準偏差も4度程度とひどい値です。ここでのプログラムはテストのため1sec周期の動作になっています。mpu6050は最短で1msec間隔で動作しますので,短い周期でデータ採取して時間軸平滑化フィルタを使うなどの工夫が必要と思われます。