Android
共有ストレージでのファイル操作(API30以降)
compileSdk:36 target:36でコンパイルしAndroid16(API36)で動作確認済み
2025.9.29 2023.8.4 Coskx Lab
0 「DocumentFile」を使う場合のgradleに関する変更 20250930
「DocumentFile」を使う場合には,
build.gradle(app) の dependencies {} 内に
implementation "androidx.documentfile:documentfile:1.1.0"
を記述することが必要となりました。
これがないと import androidx.documentfile.provider.DocumentFile; が不正となり,コンパイルできません。
1 はじめに
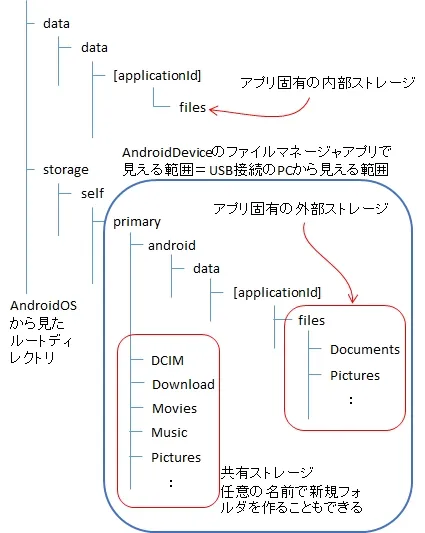
Android11(R)API30以降ではファイル保存領域の扱いが厳格になっています。
大きく分けると次のようになっています。
- 内部ストレージ内のアプリ固有のディレクトリ
他のアプリからはアクセス出来ないディレクトリ
→アプリ固有のディレクトリのページへ
- 外部ストレージ内のアプリ固有のディレクトリ
他のアプリは通常アクセスできないが,USB接続のPCあるいは特別に権限を持ったファイルマネージャアプリなどではアクセス可能なディレクトリ →補足
→アプリ固有のディレクトリのページへ
- 共有ストレージ内のメディア用途のディレクトリ
メディア ファイル用で他のアプリもアクセスできるディレクトリ
- 共有ストレージ内の一般用途のディレクトリ
他のアプリからアクセスされることを前提としたディレクトリ
アプリが自分専用のディレクトリを共有ストレージ作成することを想定しています。
作成したディレクトリは他アプリからも読み込めます。
本ページで解説しています。
補足 外部ストレージ内のアプリ固有のディレクトリを見られるファイルマネージャアプリはないかもしれません。
そのため,アプリ固有のディレクトリは,自分専用にしておくのが良いようです。
ストレージ詳細
2 使用環境
- Windows 11 64-bit
- Android Studio Narwhal | 2025.1.1 Patch 1
Build #AI-251.25410.109.2511.13752376, built on July 9, 2025
Runtime version: 21.0.6+-13391695-b895.109 amd64
VM: OpenJDK 64-Bit Server VM by JetBrains s.r.o.
Toolkit: sun.awt.windows.WToolkit - java (JavaVersion.VERSION_11)
- Build Target 35 (24以降で動作検証済)
3 共有ストレージの操作
Android11(R)API30より前までのファイル操作を行うアプリでは,インストール時において,ユーザに全ストレージへの権限を与えてもらうようになっていました。
全ストレージに対して作業するようなアプリはまれです。そこで,ユーザがファイル書き込みや読み込みを行う範囲で権限を与えるようにセキュリティが高められました。
ストレージ アクセス フレームワーク(SAF)という仕組みを使用します。
今のところ,ファイルの保存場所の指示や,ディレクトリの指示ではSAFのピッカーが使われます。
ピッカーは使いにくいため,ユーザに操作してもらうのは申し訳ない感じです。
ファイル操作の方法は2つあります。
- ファイル指示方式 ファイルの書き込みを行うときは,そのたびにどのディレクトリにどのようなファイル名で書き込むのかをユーザに指示してもらいます。
(ユーザは既存ディレクトリ内で指示できるし,新規ディレクトリを作ってそのディレクトリ内で指示することも出来ます。)
(使用できるディレクトリは「ダウンロード」およびその支配下のディレクトリのみのようです。)
この操作をしてもらったことでユーザのストレージ使用許可が得られたことになります。
ファイルの読み込みを行うときは,そのたびにどのディレクトリのどのファイルを読み出すのかをユーザに指示してもらいます。
→ 4 ファイル指示方式 - ディレクトリ指示方式 ファイル書き込み・読み込みで,1つのファルダ(外部ストレージ)を常に使うような場合には,予め使用するディレクトリをユーザに指示してもらいます。
(自アプリ専用ディレクトリを作成する場合に対応します。DownloadやDCIMなどのディレクトリの並びに,専用ディレクトリを作ることができます。作成したディレクトリはファイルマネージャアプリや他アプリからも読み込めます。)
ディレクトリ指示方式はファイル指示方式より使い勝手が良いです。
(ユーザは既存ディレクトリを指示でき,また新規ディレクトリを作ってそれを指示することも出来ます。)
この操作をしてもらったことでユーザの許可が得られたことになります。
→ 5 ディレクトリ指示方式
なお,本説明内容のテストプログラムをダウンロードできます。
注意 ファイル消去の操作は危険なので,できないようにコメントアウトしてあります。ボタンdeleteも削除されています
ダウンロード 「4.ファイル指示方式共有ストレージ操作」
ダウンロード 「5.ディレクトリ指示方式共有ストレージ操作」
4 ファイル指示方式 (共有ストレージの操作)
ファイルの書き込み・読み込みを行うときは,ストレージを使うので必ずユーザに指示してもらいます。
アプリの動作中にユーザがファイルの指定などをするのには,SAFのピッカー(Picker)が使われますが,そのピッカーの起動にはIntentの仕組みが使われます。
Intentでピッカーを呼び出して,ピッカーから返されたファイルのUri(Uniform Resource Identifier)を使ってファイル操作を行います。
Uriにはディレクトリ名+ファイル名の情報が含まれていています。(SAF以前ではディレクトリ名+ファイル名を直接使ってファイル操作をしていました。)
Uriのインスタンスuriについてuri.getPath()でディレクトリ名+ファイル名を知ることができ,確認することができます。
Intentで別のActivityを起動し再び元のActivityに戻ってくるというふるまいを考慮したプログラムになります。
4.1 テキストファイルの書き込み
ファイル書き込み用のIntentのインスタンスをインスタンス変数として宣言をしておきます。
またIntentを起動するためのActivityResultLauncher<Intent>のインスタンスをインスタンス変数として宣言をしておきます。
private ActivityResultLauncher<Intent> launcher_createTextfile;
onCreate()中でそのIntentのインスタンス変数を初期化し,またActivityResultLauncherのインスタンス変数も初期化し,戻ってきた時の作業(ファイルのUriを使ったファイル書き込み)も前もって記述しておきます。
実際はonCreate()から次のメソッドを呼び出しています。
intent_createTextfile = new Intent(Intent.ACTION_CREATE_DOCUMENT);
intent_createTextfile.addCategory(Intent.CATEGORY_OPENABLE);
intent_createTextfile.setType("text/plain");
launcher_createTextfile = registerForActivityResult(
new ActivityResultContracts.StartActivityForResult(),
result -> {
if (result.getResultCode() == Activity.RESULT_OK && null != result.getData()) {
Uri uri = result.getData().getData();
// Uriを表示
String uritext = String.format(Locale.US, "Uri: %s",uri.getPath());
uriDisplay.setText(uritext);
Log.i(TAG,"launcher_createTextfile > " + uritext);
// launcher_createTextfile > Uri: /document/primary:test0/SampleText.txt
try(OutputStream outputStream = getContentResolver().openOutputStream(uri)) {
if(outputStream != null){
outputStream.write(textToBeSaved.getBytes());
}
} catch(Exception e){
e.printStackTrace();
}
}
}
);
}
ファイル書き込みを行うまでに書き込みたいtextをStringインスタンス変数に確定しておきます。
ピッカーに表示するファイル名候補も設定します。
そうして,Launcherでファイル書き込み用のIntentを起動します。
textToBeSaved = "Hello,\nThis is a sample text to share.\nIt's working.\n";
//書込用ファイル名(候補)は保存Intent呼び出しまでに確定されていればよい
String textfname = "SampleText.txt";
intent_createTextfile.putExtra(Intent.EXTRA_TITLE, textfname);
//書込Intentの呼び出し
launcher_createTextfile.launch(intent_createTextfile);
そうすると,画面にピッカーが現れるので,ユーザが書き込みのためのディレクトリとファイル名を設定します。
設定が終わると,予め記述されていた方法でファイル書き込みを行います。
ファイル書き込みでは,Uriを元にOutputStreamを得て,
outputStream.write(textToBeSaved.getBytes());
で書き込みます。(これはsetIntentCreateTextfile()で,'result -> {'の中に記述されている)
この書き込みでは,既存ファイルと同じ名前でファイルを書き込もうとしても,ピッカーがファイル名末尾に(1)(2)...をつけ足してしまうので,
(そのようなファイル名を持つUriを返してくる)上書きはできません。(上書き保存のためには,一工夫が必要でしょう。)
4.2 テキストファイルの読み込み
ファイル読み込み用のIntentのインスタンスをインスタンス変数として宣言をしておきます。
またIntentを起動するためのActivityResultLauncher<Intent>のインスタンスをインスタンス変数として宣言をしておきます。
private ActivityResultLauncher<Intent> launcher_loadTextfile;
onCreate()中でそのIntentのインスタンス変数を初期化し,またActivityResultLauncherのインスタンス変数も初期化し,戻ってきた時の作業(ファイルのUriを使ったファイル読み込み)も前もって記述しておきます。
実際はonCreate()から次のメソッドを呼び出しています。
intent_loadTextfile = new Intent(Intent.ACTION_OPEN_DOCUMENT);
intent_loadTextfile.addCategory(Intent.CATEGORY_OPENABLE);
intent_loadTextfile.setType("text/plain");
launcher_loadTextfile = registerForActivityResult(
new ActivityResultContracts.StartActivityForResult(),
result -> {
if (result.getResultCode() == Activity.RESULT_OK && null != result.getData()) {
Uri uri = result.getData().getData();
// Uriを表示
String uritext = String.format(Locale.US, "Uri: %s", uri.getPath());
uriDisplay.setText(uritext);
Log.i(TAG, "launcher_loadTextfile > " + uritext);
// launcher_loadTextfile > Uri: /document/primary:test0/SampleText.txt
StringBuilder text = new StringBuilder();
try(InputStream inputStream = getContentResolver().openInputStream(uri);
InputStreamReader inputStreamReader = new InputStreamReader(inputStream);
BufferedReader reader = new BufferedReader(inputStreamReader)) {
String lineBuffer;
lineBuffer = reader.readLine();
while (lineBuffer != null) {
text.append(lineBuffer).append("\n");
lineBuffer = reader.readLine();
}
Log.i(TAG, "text read = [" + text + "]");
loadedTextDisplay.setText(text.toString());
} catch(Exception e) {
e.printStackTrace();
}
}
}
);
}
Launcherでファイル読み込み用のIntentを起動します。
そうすると,画面にピッカーが現れるので,ユーザが読み込みのためのファイルを指示します。
指示が終わると,予め記述されていた方法でファイル読み込みを行います。
ファイル読み込みでは,Uriを元にInputStreamを得て,
InputStreamReader inputStreamReader = new InputStreamReader(inputStream);
BufferedReader reader = new BufferedReader(inputStreamReader)) {
String lineBuffer;
lineBuffer = reader.readLine();
while (lineBuffer != null) {
text.append(lineBuffer).append("\n");
lineBuffer = reader.readLine();
}
で読み込みます。(これはsetIntentLoadTextfile()で,'result -> {'の中に記述されている)
そして読み込んだ内容を次の作業に使います。(ここではTextViewに表示しています)
4.3 画像ファイルの書き込み
ファイル書き込み用のIntentのインスタンスをインスタンス変数として宣言をしておきます。
またIntentを起動するためのActivityResultLauncher<Intent>のインスタンスをインスタンス変数として宣言をしておきます。
private ActivityResultLauncher<Intent> launcher_createImagefile;
onCreate()中でそのIntentのインスタンス変数を初期化し,またActivityResultLauncherのインスタンス変数も初期化し,戻ってきた時の作業(ファイルのUriを使ったファイル書き込み)も前もって記述しておきます。
実際はonCreate()から次のメソッドを呼び出しています。
intent_createImagefile = new Intent(Intent.ACTION_CREATE_DOCUMENT);
intent_createImagefile.addCategory(Intent.CATEGORY_OPENABLE);
//intent_createImagefile.setType("image/jpeg");
intent_createImagefile.setType("*/*"); //フィルタリングだけのようだからこれでも構わない
launcher_createImagefile = registerForActivityResult(
new ActivityResultContracts.StartActivityForResult(),
result -> {
if (result.getResultCode() == Activity.RESULT_OK && null != result.getData()) {
Uri uri = result.getData().getData();
// Uriを表示
String uritext = String.format(Locale.US, "Uri: %s", uri.getPath());
uriDisplay.setText(uritext);
Log.i(TAG, "launcher_createImagefile > " + uritext);
// launcher_createImagefile > Uri: /document/primary:test0/SampleImage.jpg
try(OutputStream outputStream = getContentResolver().openOutputStream(uri)) {
if(outputStream != null){
bitmapToBeSaved.compress(Bitmap.CompressFormat.JPEG, 100, outputStream);
}
} catch(Exception e){
e.printStackTrace();
}
}
}
);
}
ファイル書き込みを行うまでに書き込みたい画像をBitmapインスタンス変数に確定しておきます。
ピッカーに表示するファイル名候補も設定します。
そうして,Launcherでファイル書き込み用のIntentを起動します。
String imagefname = "SampleImage.jpg";
intent_createImagefile.putExtra(Intent.EXTRA_TITLE, imagefname);
//書込Intentの呼び出し
launcher_createImagefile.launch(intent_createImagefile);
そうすると,画面にピッカーが現れるので,ユーザが書き込みのためのディレクトリとファイル名を設定します。
設定が終わると,予め記述されていた方法でファイル書き込みを行います。
ファイル書き込みでは,Uriを元にOutputStreamを得て,
bitmapToBeSaved.compress(Bitmap.CompressFormat.JPEG, 100, outputStream);
で書き込みます。(これはsetIntentCreateImagefile()で,'result -> {'の中に記述されている)
この書き込みでは,既存ファイルと同じ名前でファイルを書き込もうとしても,ピッカーがファイル名末尾に(1)(2)...をつけ足してしまうので,
(そのようなファイル名を持つUriを返してくる)上書きはできません。(上書き保存のためには,一工夫が必要でしょう。)
4.4 画像ファイルの読み込み
ファイル読み込み用のIntentのインスタンスをインスタンス変数として宣言をしておきます。
またIntentを起動するためのActivityResultLauncher<Intent>のインスタンスをインスタンス変数として宣言をしておきます。
private ActivityResultLauncher<Intent> launcher_loadImagefile;
onCreate()中でそのIntentのインスタンス変数を初期化し,またActivityResultLauncherのインスタンス変数も初期化し,戻ってきた時の作業(ファイルのUriを使ったファイル読み込み)も前もって記述しておきます。
実際はonCreate()から次のメソッドを呼び出しています。
intent_loadImagefile = new Intent(Intent.ACTION_OPEN_DOCUMENT);
intent_loadImagefile.addCategory(Intent.CATEGORY_OPENABLE);
//intent_loadImagefile.setType("image/jpeg");
intent_loadImagefile.setType("*/*"); //フィルタリングだけのようだからこれでも構わない
launcher_loadImagefile = registerForActivityResult(
new ActivityResultContracts.StartActivityForResult(),
result -> {
if (result.getResultCode() == Activity.RESULT_OK && null != result.getData()) {
Uri uri = result.getData().getData();
// Uriを表示
String uritext = String.format(Locale.US, "Uri: %s", uri.getPath());
uriDisplay.setText(uritext);
Log.i(TAG, "launcher_loadImagefile > " + uritext);
// launcher_loadImagefile > Uri: /document/primary:test0/SampleImage.jpg
try(InputStream inputStream = getContentResolver().openInputStream(uri);
BufferedInputStream bufferedInputStream = new BufferedInputStream(inputStream)) {
Bitmap bitmap = BitmapFactory.decodeStream(bufferedInputStream);
imageview2.setImageBitmap(bitmap);
} catch(Exception e){
e.printStackTrace();
}
}
}
);
}
Launcherでファイル読み込み用のIntentを起動します。
そうすると,画面にピッカーが現れるので,ユーザが読み込みのためのファイルを指示します。
指示が終わると,予め記述されていた方法でファイル読み込みを行います。
ファイル読み込みでは,Uriを元にInputStreamを得て,さらにInputStreamからBufferedInputStreamを得て,
Bitmap bitmap = BitmapFactory.decodeStream(bufferedInputStream);
で読み込みます。(これはsetIntentLoadImagefile()で,'result -> {'の中に記述されている)
そして読み込んだ内容を次の作業に使います。(ここではImageViewに表示しています)
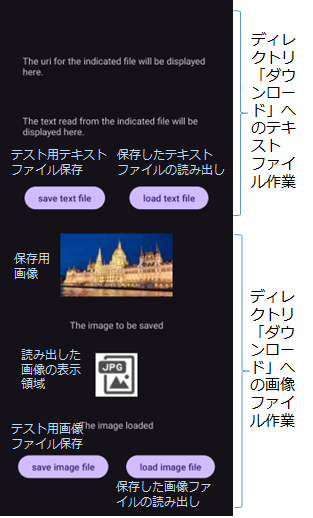
4.5 実行の様子

保存・読み出しのできるディレクトリは「ダウンロード」およびその支配下のディレクトリのみのようです。
5 ディレクトリ指示方式 (共有ストレージの操作)
特定のディレクトリに対して,多くの操作を行うようなアプリでは,特定のディレクトリをユーザに1回だけ指示してもらい,後はアプリ側がファイル名を決めて作業します。
アプリの動作中にユーザがディレクトリの指定をするのには,SAFのピッカー(Picker)が使われますが,そのピッカーの起動にはIntentの仕組みが使われます。
Intentでピッカーを呼び出して,ピッカーから返されたディレクトリのUri(Uniform Resource Identifier)を使ってファイル操作を行います。
Uriにはディレクトリ名の情報が含まれていています。
ディレクトリを表すUriとファイル名文字列を合成すると,ファイルを表すUriを作ることができます。
ファイルを表すUriを使えばファイルの読み込み・書き込みが出来ます。
このUriのインスタンスuriについてuri.getPath()でディレクトリ名+ファイル名を知ることができ,確認することができます。
なお,Intentで別のActivityを起動し再び元のActivityに戻ってくるというふるまいを考慮したプログラムになります。
5.1 ユーザ指定の作業ディレクトリの取得
ディレクトリ指示用のIntentのインスタンスをインスタンス変数として宣言をしておきます。
またIntentを起動するためのActivityResultLauncher
private ActivityResultLauncher<Intent> launcher_getFolder;
onCreate()中でそのIntentのインスタンス変数を初期化し,またActivityResultLauncherのインスタンス変数も初期化し,ピッカーから戻ってきた時の作業も前もって記述しておきます。
ピッカーから戻ってきたディレクトリを表すUriをownDirUriとし,takePersistableUriPermission()を使ってシステムに保存します。(次回アプリ起動時にはこのUriを使います。)
DocumentFile.fromTreeUriを使って,Uri ownDirUriをDocumentFile ownDirectoryに変換しておきます。
後で,ディレクトリ+ファイル名文字列で合成するUri生成に必要です。
launcher_getFolder= registerForActivityResult(
new ActivityResultContracts.StartActivityForResult(),
result -> {
if (result.getResultCode() == Activity.RESULT_OK && null != result.getData()) {
Uri uri = result.getData().getData();
if (uri != null) {
ownDirUri = uri;
// ownDirUriを表示
Log.i(TAG, "launcher_getFolder ownDirUri.toString() = " + ownDirUri.toString());
//launcher_getFolder ownDirUri.toString() = content://com.android.externalstorage.documents/tree/primary%3Atest0
Log.i(TAG, "launcher_getFolder ownDirUri.getPath() = " + ownDirUri.getPath());
//launcher_getFolder ownDirUri.getPath() = /tree/primary:test0
//永久保存 ここから
// アプリをアンインストールし,再インストールしたら,アプリがownDirUri情報を覚えていないので使えなくなる
// アプリをアンインストールした時点でOS側も無効
// デバイスが再起動しても有効
// 対象ディレクトリは削除かリネームさえても復活すれば有効
getContentResolver().takePersistableUriPermission(ownDirUri, (Intent.FLAG_GRANT_READ_URI_PERMISSION
| Intent.FLAG_GRANT_WRITE_URI_PERMISSION));
//永久保存 ここまで
ownDirectory = DocumentFile.fromTreeUri(getApplicationContext(), ownDirUri);
assert ownDirectory != null;
Log.i(TAG, "launcher_getFolder ownDirectory.getName() = " + ownDirectory.getName());
//launcher_getFolder ownDirectory.getName() = test0
} else {
Log.i(TAG, "launcher_getFolder No directory is assigned for own work.");
}
}
}
);
必要な項目を指定して,void assignOwnDirectory()でLauncherでファイル読み込み用のIntentを起動します。
intent_getFolder.addFlags(FLAG_GRANT_READ_URI_PERMISSION);
launcher_getFolder.launch(intent_getFolder);
}
なお,次回アプリ起動時にはOnresumeでgetPersistedUriPermissions()を使って保存されたディレクトリのUriを読み出し,Uri ownDirUriとDocumentFile ownDirectoryを生成しています。
protected void onResume() {
// returning from Intent Folder Picker, onResume() is called after onActivityResult().
super.onResume();
String message;
List<UriPermission> permissionlist = getContentResolver().getPersistedUriPermissions();
Log.i(TAG, "onResume() permissionlist = " + permissionlist);
//onResume() permissionlist = [UriPermission {uri=content://com.android.externalstorage.documents/tree/primary%3Atest0, modeFlags=3, persistedTime=1690959238758}]
if (permissionlist.size()!=0 && permissionlist.get(0).getUri()!=null) { //登録済だったら
ownDirUri = permissionlist.get(0).getUri();
Log.i(TAG,"onResume() ownDirUri.toString() = " + ownDirUri.toString());
//onResume() ownDirUri.toString() = content://com.android.externalstorage.documents/tree/primary%3Atest0
Log.i(TAG,"onResume() ownDirUri.getPath() = " + ownDirUri.getPath());
//onResume() ownDirUri.getPath() = /tree/primary:test0
DocumentFile dir = DocumentFile.fromTreeUri(getApplicationContext(), ownDirUri);
if (dir != null && dir.getName() != null &amp;amp;amp;&amp;amp; dir.exists()) {
ownDirectory = dir;
Log.i(TAG, "onResume() ownDirectory.toString() = " + ownDirectory.toString());
//onResume() ownDirectory.toString() = androidx.documentfile.provider.TreeDocumentFile@98f2ab
Log.i(TAG, "onResume() ownDirectory.getName() = " + ownDirectory.getName());
//onResume() ownDirectory.getName() = test0
assignOwnDir.setEnabled(false);
message = "Own work directory has assigned. '" + ownDirectory.getName() +"'";
} else {
message = "No own work directory assigned.\nPlease assign with Assign Button.";
}
} else {
message = "No own work directory assigned.\nPlease assign with Assign Button.";
}
Log.i(TAG, "onResume() message = " + message);
//onResume() message = Own work directory has assigned. 'test0'
textview.setText(message);
}
5.2 ディレクトリ内でのファイル操作
ユーザが指定したディレクトリのUriが得られたら,ファイルの操作が出来ます。
ディレクトリのUriを
Uri ownDirUri;
としたとき,同じディレクトリのDocumentFile表現を
DocumentFile ownDirectory;
とすると
ownDirectory = DocumentFile.fromTreeUri(getApplicationContext(), ownDirUri);
で得られます。
そして,操作したいファイル名の文字列を
String filename;
とします。
対象とするファイルのUriが分かれば,UriからOutputStreamを作れば書き込み出来ます。
対象とするファイルのUriは,DocumentFileの助けを借りて
DocumentFile file = ownDirectory.createFile(filename);
file.getUri();
で新規に得られます。
ただし,既存ファイルがある場合は新規に作成してはならず,
DocumentFile file = ownDirectory.findFile(filename);
で得られます。
5.2.1 ファイル書き込み
書き込みたい文字列を
String text;
とする。
・新規保存する(既存ファイルが存在する場合は上書き)
saveFile(ownDirectory, filename, text);
・既存ファイルに追記する(既存ファイルが存在しない場合は新規保存)
appendFile(ownDirectory, filename, text);
のように次のメソッドを呼び出す。
private void saveFile(DocumentFile dir, String filename, String text) {
DocumentFile file = dir.findFile(filename);
if (file == null) {//ファイルがなかった
file = dir.createFile("*.*", filename);
}
assert file != null;
saveFile0(file.getUri(),text);
}
//既存ファイルに追記 ただし,既存ファイルが無ければ,追記ではなく単にファイル保存する
private void appendFile(DocumentFile dir, String filename, String text) {
DocumentFile file = dir.findFile(filename);
if (file == null) {//ファイルがなかった
file = dir.createFile("*.*", filename);
}
assert file != null;
appendFile0(file.getUri(),text);
}
private void saveFile0(Uri uri, String text) {
try {
OutputStream out = getContentResolver().openOutputStream(uri, "wt");
//一般的には,wは新規作成または上書きだけれど,ContentResolver.OpenOutputStreamのmode指定は異なる
//tはtruncate wだけだと,上書きだけれど,既存ファイルの方が上書き希望のファイルより大きなときに
//既存ファイルの後ろ側が残ってしまう。tを付けるとこれを防げる。
out.write(text.getBytes());
out.close();
} catch (Exception e) {
e.printStackTrace();
}
}
private void appendFile0(Uri uri, String text) {
try {
OutputStream out = getContentResolver().openOutputStream(uri,"wa");
out.write(text.getBytes());
out.close();
} catch (Exception e) {
e.printStackTrace();
}
}
5.2.2 ファイル読み込み
対象とするファイルのUriが分かっていれば,次のメソッドでテキストファイルを読み込むことができます。
ここでは読み取った文字列をまとめてメソッドの返す値としています。
StringBuilder text = null;
try(InputStream inputStream = getContentResolver().openInputStream(uri);
InputStreamReader inputStreamReader = new InputStreamReader(inputStream);
BufferedReader reader = new BufferedReader(inputStreamReader)) {
text = new StringBuilder();
String lineBuffer;
lineBuffer = reader.readLine();
while (lineBuffer != null) {
text.append(lineBuffer).append("\n");
lineBuffer = reader.readLine();
}
//Log.i(TAG, "text read = [" + text + "]");
} catch(Exception e) {
e.printStackTrace();
}
assert text != null;
return text.toString();
}
5.2.3 ディレクトリ内のファイル一覧
次のメソッドでディレクトリ内のファイル一覧が得られます。
ここではTextViewに表示しています。
if (ownDirectory == null) return;
StringBuilder message = new StringBuilder(ownDirectory.getName() + "\n");
for (DocumentFile docfile : ownDirectory.listFiles()) {
if (docfile.isFile()) {
message.append(" ").append(docfile.getName()).append("\n");
}
}
textview.setText(message.toString());
}
5.2.4 ディレクトリ内のファイル全消去
次のメソッドでディレクトリ内のファイル全消去になります。
ここではTextViewに結果を表示しています。
if (ownDirectory == null) return;
for (DocumentFile docfile : ownDirectory.listFiles()) {
if (docfile.isFile()) {
docfile.delete();
}
}
textview.setText("The folder is initialized.");
}
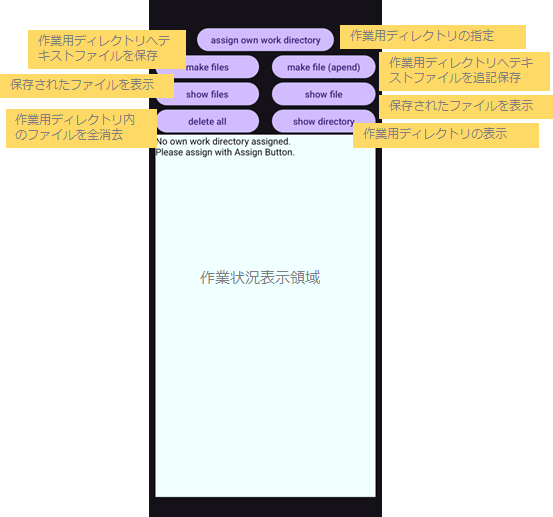
5.3 実行の様子

このアプリでは,ユーザ指定の作業ディレクトリの取得は一回のみできます。
やり直したい場合は,一度このアプリをアンインストールして,再度インストールします。
6 補足
- SAF(ストレージアクセスフレームワーク)を利用したとき,共有ストレージ操作について権限付与は不要です。(AndroidManifest.xmlへの権限記載,権限取得操作はいらない)
- これまで,API28以前におけるファイル操作では,書き込みや消去の直後に,MediaScannerServiceに登録しないとOSへの反映が出来ませんでしたが,それはすべて不要になりました。
- ピッカーで扱える範囲はOSのバージョンやAndroid Deviceの設計に依存しているため,Android Deviceにより見え方が異なります。
- ピッカーでGoogle Driveも扱えるとなっていますが,Google Driveアプリがインストールされている必要があるとされています。(未確認)
- ピッカーでGoogle Driveも扱えるとなっていますが,ファイル指示方式のときのみで,ディレクトリ指示方式では使えません。(ファイル指示方式のとき,ピッカー起動後の左上の3本線設定からGoogle Driveが選べます。)
7 まとめ
共有ストレージにおいて,ファイル指示方式によってファイル操作について示しました。
- ファイル書き込み
- ファイル読み込み
共有ストレージにおいて,ディレクトリ指示方式によってファイル操作について示しました。
- ファイル書き込み(上書き,追記)
- ファイル読み込み
- ディレクトリ内ファイル一覧
- ディレクトリ内全ファイル削除
ファイル指示方式・ディレクトリ指示方式のどちらでもファイルのUriが得られてしまえば,操作は全く同じになります。
コンパイル時の設定(build.gradle(Module:app))
compileSdk 36
minSdk 24
targetSdk 36
でコンパイルし,Pixel8a(Android16(API36))での動作確認済み
