Wi-FiマイコンXIAO ESP32S3とiOSデバイスとの UartBLE通信
(1) ESP32S3単体とiOSデバイスの通信
(2) ESP32S3+温度センサBMP280とiOSデバイスの通信
2023.9.28 Coskx Lab
1 はじめに
温度センサBMP280を載せたWi-FiマイコンXIAO ESP32S3からiPhoneなどのiOSデバイスに向けてBLE(Bluetooth Low Energy)を使って温度情報を送ります。
Wi-FiマイコンとiOSデバイス間の通信は無線LAN環境の下ではHTTPでの通信ができますが,無線LAN環境がない場合では,Bluetooth通信が便利です。
XIAO ESP32S3はBLE UART Profileを使って通信します。(Bluetooth Classicではありません。)
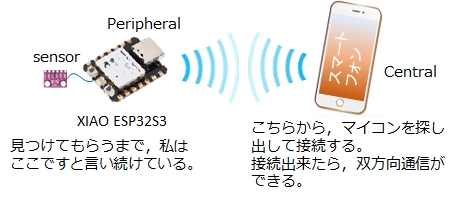
BLEコネクション通信では,Central(or Master or Observer)とPeripheral(or Slave or Broadcaster)の間で通信が行われます。
ここでは,iOSをCentral,XIAO-ESP32S3をPeripheralとして使うことにします。
(PeripheralはServer,CentralはClientと説明されることもあります。)
ESP32 Bluetooth4.2でのBLE通信のペアリングでは,セキュリティに関する記述をしなくてもよかったのですが,ESP32S3 Bluetooth5.0ではセキュリティに関する記述が必要になったようです。記述していないとペアリング出来ず,エラーを通知してきます。
セキュリティの関する記述には次の2つの方法があります。
(1)PIN(暗証番号)を設定する
6桁のPINをESP32S3のプログラム(setup中)に設定しておき,Androidデバイスとペアリングする際におなじPINを入力することでPairingが完了します。(ここではPINは123456の6桁です。PINは6桁にする必要があります。)
(2)PINは設定しないが認証モードを簡易なものに設定する
なお,ここで使用するiOSのアプリ"Bluefruit Connect"はアプリ起動の度に,通信相手を探して接続するようになっているため,ペアリングを必要としていません。
2 使用環境
- Windows 10 64-bit
- ArduinoIDE 2.2.1
- XIAO ESP32S3
- BMP280 (HW-611 E/P 280)
(BLE Uart通信のテストだけなら不要) - iPhone + "Bluefruit Connect"
3 準備
3.1 ArduinoIDE
(1)Arduino IDEのメニューバーから[ファイルFile] -> [環境設定(Preferences)]
Additional board manager URLsに
https://files.seeedstudio.com/arduino/package_seeeduino_boards_index.json
および
https://raw.githubusercontent.com/espressif/arduino-esp32/gh-pages/package_esp32_index.json
を設定してOK
(2)ツール[Tools] > ボード[Board] > Boards Manager
検索boxに「ESP」を入力すると複数のボード候補が出てくるので
esp32 by Espressif Systems
をinstall
(3)ツール[Tools] > ボード[Board]でESP32を探すとXIAO ESP32S3が見つかるので,これを選ぶ。
3.2 XIAO ESP32S3
XIAO ESP32S3の説明書を読んでプログラムの転送方法を確認します。
(USBケーブルでつないで書き込むだけでした。)
4 XIAO ESP32S3と温度センサBMP280の配線
(BLE Uart通信のテストだけならBMP280は使用しないので,ここは読み飛ばしてください)
温度センサBMP280は温度をデジタル値に変換しているので,そのデータをXIAO ESP32S3が読み出します。
XIAO ESP32S3と温度センサBMP280はI2C接続ですので,電源線,GND線の他はSCLとSDAの2本のみで通信できます。
CSBをVCCにつなぐとBMP280はI2C接続になります。(データシートによれば確実にVCCにつなぐべきとなっています)
SDO(シルク印刷は間違えていてSDDとなっている)をVCCにつなぐとBMP280のI2Cアドレスは77になります。GNDにつなぐとBMP280のI2Cアドレスは76になります。Groveライブラリのデフォルトは77なのでVCCにつないでいます。
なおBMP280ではSDA,SCLをpullupせずに動作しています。

XIAO ESP32S3と温度センサBMP280の配線
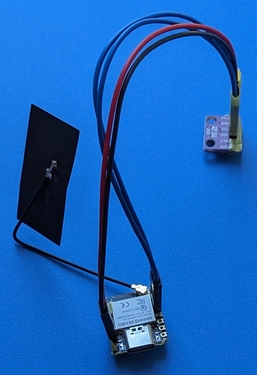
ブレッドボードには載せないので,XIAO ESP32S3のピンを上向きに付けています。
XIAO ESP32S3と温度センサBMP280
5 XIAO ESP32S3のスケッチコード(サーバプログラム)
ここでは,
(1)BMP280を使用せず,BLE Uart通信のテストだけのプログラム
(2)BMP280を使用して,BLE Uart通信で温度などの情報を送信するプログラム
の2つを紹介します。
XIAO ESP32S3のスケッチコードは,クライアントがAndroidデバイスであってもWindowsPCであっても同じものを使っています。
Androidデバイス版の解説
WindowsPC版の解説
5.1 BMP280を使用せず,BLE Uart通信のテスト
プログラムの概要クライアント(iOSスマホなど)からのリクエストで,サーバであるXIAO ESP32S3は,文字列"Hello"と経過時間を,クライアントに返します。
具体的には,XIAO ESP32S3は文字列"start"を受け取ったら1秒間隔で文字列"Hello"と経過時間を送信し,文字列"stop"を受け取ったら送信をやめるようにします。
説明
UART通信ですので,プログラム中の受信のパートと送信のパートが分かれば,そこにやりたいことを書けばよいことになります。
受信時はclass MyCallbacks: public BLECharacteristicCallbacksのonWrite()が呼び出され,String rxValueに受信文字列が保存されます。
ここが受信のパートになります。
受信パートでは受信文字列が"start","stop"であった時には,作業フラグisrequestedをそれぞれtrue,falseに設定します。
loop()内でdeviceConnected およびisrequestedがtrueで,一定時間が経過したら,送信すべきデータ文字列(文字列"Hello"と経過時間)を作って,送信します。
ここが送信パートになります。
もう少し要点を絞ってみます。
◎受信時は,
void onWrite(BLECharacteristic *pCharacteristic)
が呼び出されて,
String rxValue = pCharacteristic->getValue();
で,String型の文字列rxValueに受信文字列が得られます。
◎送信時は,送信したいString型の文字列を
pTxCharacteristic->setValue();
で送って
pTxCharacteristic->notify();
で送信相手に送ったよと知らせて完了です。
なお,
#define DEVICENAME "UART ESP32S3"
は自分の名前です。通信相手のiOSスマホなどから見つけてもらう名前です。
#define INTERVAL 1000 //millisec
を変更するとデータ送信間隔が変わります。
BLESecurity *pSecurity = new BLESecurity();
pSecurity->setStaticPIN(123456);
上記2行がペアリング時に使われるPINの設定です。PINを設定しない場合は,次の2行に置き換えてください。
BLESecurity *pSecurity = new BLESecurity();
pSecurity->setAuthenticationMode(ESP_LE_AUTH_REQ_SC_ONLY);
次のコードは,Arduino IDEの既存スケッチ例"BLE_uart.ino"を元に作ったものです。
Arduino IDEでコンパイルするときは,ライブラリ"Grove_-_Barometer_Sensor_BMP280"を予めIDEに追加しておいてください。
#include <BLEServer.h>
#include <BLEUtils.h>
#include <BLE2902.h>
#include <Wire.h>
#define DEVICENAME "UART test"
#define INTERVAL 1000 //millisec
// See the following for generating UUIDs:
// https://www.uuidgenerator.net/
#define SERVICE_UUID "6E400001-B5A3-F393-E0A9-E50E24DCCA9E" // UART service UUID
#define CHARACTERISTIC_UUID_RX "6E400002-B5A3-F393-E0A9-E50E24DCCA9E"
#define CHARACTERISTIC_UUID_TX "6E400003-B5A3-F393-E0A9-E50E24DCCA9E"
BLEServer *pServer = NULL;
BLECharacteristic * pTxCharacteristic;
bool deviceConnected = false;
bool oldDeviceConnected = false;
boolean isrequested = false;
int interval = INTERVAL; //millisec
int currenttime = 0; //millisec
int previoustime = 0; //millisec
class MyServerCallbacks: public BLEServerCallbacks {
void onConnect(BLEServer* pServer) {
deviceConnected = true;
Serial.println("** device connected");
};
void onDisconnect(BLEServer* pServer) {
deviceConnected = false;
Serial.println("** device disconnected");
}
};
class MyCallbacks: public BLECharacteristicCallbacks {
void onWrite(BLECharacteristic *pCharacteristic) {
String rxValue = pCharacteristic->getValue();
if (rxValue.length() > 0) {
//Display on serial monitor for debug
Serial.println("*********");
Serial.print("Received Value: ");
rxValue.trim();
Serial.println(rxValue);
Serial.println("*********");
//Reply as is
pTxCharacteristic->setValue(rxValue);
pTxCharacteristic->notify();
delay(10);
if (rxValue.indexOf("start") == 0) { //"start" has found
isrequested = true;
previoustime = millis(); //elapsed time(ms)
previoustime -= interval;
} else if (rxValue.indexOf("stop") == 0) { //"stop" has found
isrequested = false;
}
}
}
};
void setup() {
Serial.begin(115200);
// Create the BLE Device
BLEDevice::init(DEVICENAME); //BLE Device Name scaned and found by clients
// Create the BLE Server
pServer = BLEDevice::createServer();
pServer->setCallbacks(new MyServerCallbacks());
// Create the BLE Service
BLEService *pService = pServer->createService(SERVICE_UUID);
// Create a BLE Characteristic
pTxCharacteristic = pService->createCharacteristic(
CHARACTERISTIC_UUID_TX,
BLECharacteristic::PROPERTY_NOTIFY
);
pTxCharacteristic->addDescriptor(new BLE2902());
BLECharacteristic * pRxCharacteristic = pService->createCharacteristic(
CHARACTERISTIC_UUID_RX,
BLECharacteristic::PROPERTY_WRITE
);
pRxCharacteristic->setCallbacks(new MyCallbacks());
// Start the service
pService->start();
// Start advertising
pServer->getAdvertising()->start();
Serial.println("start advertising");
Serial.println("Waiting a client connection to notify...");
}
void loop() {
if (deviceConnected) {
if (isrequested) {
currenttime = millis(); //elapsed time(ms)
if (interval <= currenttime - previoustime) {
previoustime += interval;
char string0[256];
sprintf(string0, "Hello %.3f\r\n", currenttime/1000.f);
pTxCharacteristic->setValue((String)string0);
pTxCharacteristic->notify();
delay(10);
}
}
} else {
isrequested = false;
}
// disconnecting
if (!deviceConnected && oldDeviceConnected) {
delay(500); // give the bluetooth stack the chance to get things ready
pServer->startAdvertising(); // restart advertising
Serial.println("start advertising");
oldDeviceConnected = deviceConnected;
}
// connecting
if (deviceConnected && !oldDeviceConnected) {
// do stuff here on connecting
oldDeviceConnected = deviceConnected;
}
delay(2);//allow the cpu to switch to other tasks
}
5.2 BMP280を使用して,BLE Uart通信で温度などの情報を送信
プログラムの概要
クライアント(iOSスマホなど)からのリクエストで,サーバであるXIAO ESP32S3は,温度センサBMP280の値を取得し,クライアントに返します。
具体的には,XIAO ESP32S3は文字列"start"を受け取ったら1秒間隔で温度などのデータを送信し,文字列"stop"を受け取ったら送信をやめるようにします。
説明
UART通信ですので,プログラム中の受信のパートと送信のパートが分かれば,そこにやりたいことを書けばよいことになります。
受信時はclass MyCallbacks: public BLECharacteristicCallbacksのonWrite()が呼び出され,String rxValueに受信文字列が保存されます。
ここが受信のパートになります。
受信パートでは受信文字列が"start","stop"であった時には,作業フラグisrequestedをそれぞれtrue,falseに設定します。
loop()内でdeviceConnected およびisrequestedがtrueで,一定時間が経過したら,温度などを測定して,送信すべきデータ文字列("温度","気圧","標高")を作って,送信します。
ここが送信パートになります。
もう少し要点を絞ってみます。
◎受信時は,
void onWrite(BLECharacteristic *pCharacteristic)
が呼び出されて,
String rxValue = pCharacteristic->getValue();
で,String型の文字列rxValueに受信文字列が得られます。
◎送信時は,送信したいString型の文字列を
pTxCharacteristic->setValue();
で送って
pTxCharacteristic->notify();
で送信相手に送ったよと知らせて完了です。
なお,
#define DEVICENAME "UART ESP32S3"
は自分の名前です。通信相手のiOSスマホなどから見つけてもらう名前です。
#define INTERVAL 1000 //millisec
を変更するとデータ送信間隔が変わります。
BLESecurity *pSecurity = new BLESecurity();
pSecurity->setStaticPIN(123456);
上記2行がペアリング時に使われるPINの設定です。PINを設定しない場合は,次の2行に置き換えてください。
BLESecurity *pSecurity = new BLESecurity();
pSecurity->setAuthenticationMode(ESP_LE_AUTH_REQ_SC_ONLY);
次のコードは,Arduino IDEの既存スケッチ例"BLE_uart.ino"を元に作ったものです。
Arduino IDEでコンパイルするときは,ライブラリ"Grove_-_Barometer_Sensor_BMP280"を予めIDEに追加しておいてください。
#include <BLEServer.h>
#include <BLEUtils.h>
#include <BLE2902.h>
#include <Wire.h>
#include "Seeed_BMP280.h"
#define DEVICENAME "UART ESP32S3"
#define INTERVAL 1000 //millisec
// See the following for generating UUIDs:
// https://www.uuidgenerator.net/
#define SERVICE_UUID "6E400001-B5A3-F393-E0A9-E50E24DCCA9E" // UART service UUID
#define CHARACTERISTIC_UUID_RX "6E400002-B5A3-F393-E0A9-E50E24DCCA9E"
#define CHARACTERISTIC_UUID_TX "6E400003-B5A3-F393-E0A9-E50E24DCCA9E"
BLEServer *pServer = NULL;
BLECharacteristic * pTxCharacteristic;
bool deviceConnected = false;
bool oldDeviceConnected = false;
boolean isrequested = false;
BMP280 bmp280;
int interval = INTERVAL; //millisec
int currenttime = 0; //millisec
int previoustime = 0; //millisec
class MyServerCallbacks: public BLEServerCallbacks {
void onConnect(BLEServer* pServer) {
deviceConnected = true;
Serial.println("** device connected");
};
void onDisconnect(BLEServer* pServer) {
deviceConnected = false;
Serial.println("** device disconnected");
}
};
class MyCallbacks: public BLECharacteristicCallbacks {
void onWrite(BLECharacteristic *pCharacteristic) {
String rxValue = pCharacteristic->getValue();
if (rxValue.length() > 0) {
Serial.println("*********");
Serial.print("Received Value: ");
rxValue.trim();
Serial.println(rxValue);
Serial.println("*********");
//Reply as is
pTxCharacteristic->setValue(rxValue);
pTxCharacteristic->notify();
delay(10);
if (rxValue.indexOf("start") == 0) { //"start" has found
pTxCharacteristic->setValue("tempreture[degC], pressure[hPa], altitude[m]\r\n");
pTxCharacteristic->notify();
delay(10);
isrequested = true;
previoustime = millis(); //elapsed time(ms)
previoustime -= interval;
} else if (rxValue.indexOf("stop") == 0) { //"stop" has found
isrequested = false;
}
}
}
};
void setup() {
Serial.begin(115200);
// Create the BLE Device
BLEDevice::init(DEVICENAME); //BLE Device Name scaned and found by clients
// Create the BLE Server
pServer = BLEDevice::createServer();
pServer->setCallbacks(new MyServerCallbacks());
// Create the BLE Service
BLEService *pService = pServer->createService(SERVICE_UUID);
// Create a BLE Characteristic
pTxCharacteristic = pService->createCharacteristic(
CHARACTERISTIC_UUID_TX,
BLECharacteristic::PROPERTY_NOTIFY
);
pTxCharacteristic->addDescriptor(new BLE2902());
BLECharacteristic * pRxCharacteristic = pService->createCharacteristic(
CHARACTERISTIC_UUID_RX,
BLECharacteristic::PROPERTY_WRITE
);
pRxCharacteristic->setCallbacks(new MyCallbacks());
// Start the service
pService->start();
// Start advertising
pServer->getAdvertising()->start();
Serial.println("start advertising");
Serial.println("Waiting a client connection to notify...");
//start BMP280
if(!bmp280.init()){
Serial.println("Device error!");
}
}
void loop() {
if (deviceConnected) {
if (isrequested) {
currenttime = millis(); //elapsed time(ms)
if (interval <= currenttime - previoustime) {
previoustime += interval;
float tempreture = bmp280.getTemperature();
float pressure = bmp280.getPressure();
float altitude = bmp280.calcAltitude(pressure);
char string0[256];
sprintf(string0, "%.1f, %.0f, %.2f\r\n", tempreture, pressure/100.f, altitude);
pTxCharacteristic->setValue((String)string0);
pTxCharacteristic->notify();
delay(10);
}
}
} else {
isrequested = false;
}
// disconnecting
if (!deviceConnected && oldDeviceConnected) {
delay(500); // give the bluetooth stack the chance to get things ready
pServer->startAdvertising(); // restart advertising
Serial.println("start advertising");
oldDeviceConnected = deviceConnected;
}
// connecting
if (deviceConnected && !oldDeviceConnected) {
// do stuff here on connecting
oldDeviceConnected = deviceConnected;
}
delay(2);//allow the cpu to switch to other tasks
}
6 iOSデバイスアプリとXIAO ESP32S3のペアリング
◎このペアリング作業は不要です。
XIAO ESP32S3を起動後,iOSデバイスのBluetoothの設定で新しいデバイスとペア設定に進むと,XIAO ESP32S3のデバイス名として設定した"UART ESP32S3"が見つかると思います。
そこでPINを要求されるので,XIAO ESP32S3のプログラム中で設定したPIN "123456"を入力するとpairingが完了します。
7 iOSデバイスアプリ"Bluefruit Connect"の準備
App Storeから,"Bluefruit Connect"をダウンロードしてインストールします。

"Bluefruit Connect"のアイコン
8 XiaoESP32S3と"Bluefruit Connect"の通信
先にXiaoESP32S3に電源を与え,立ち上げておきます。

"BMP280が接続されたXIAO ESP32S3(紙のアンテナがついています。)
その後,"Bluefruit Connect"を立ち上げると最初にSelect Deviceの画面になります。
ここでは,XiaoESP32S3のプログラムの
#define DEVICENAME "UART ESP32S3"
でつけた名前"UART ESP32S3"が見つかるのでこれをタップします。
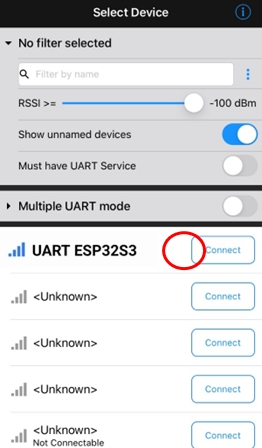
Bluefruit Connectデバイス選択画面
次にModulesと書かれたモジュール選択画面になりますので,UARTを選択します。
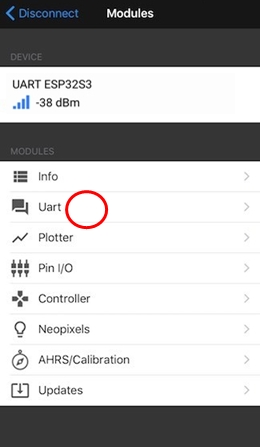
Bluefruit Connectモジュール選択画面
"Bluefruit Connect"から"start"を送信すると,1秒ごとにデータが送信されてきます。
受信した3つの数値は温度[℃],気圧[hPa],標高[m]を表しています。
"Bluefruit Connect"から"stop"を送信すると,データ送信が止まります。
"Bluefruit Connect"から"start"や"stop"を送信するときは,画面下部のテキストボックスに入力して送信ボタンをタップします。
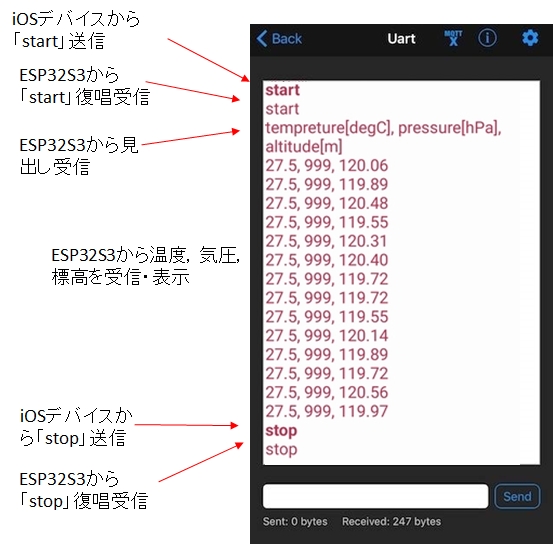
Bluefruit Connect通信画面
画面上の送受信データの表示形式は,右上メニューからDisplay Modeで切り替えられます。
(time stamp付きの表示もできます。)
画面上の送受信データのファイルへの保存は,右上メニューからExportで出来ます。
保存形式をcsvにするとtime stamp付きでの保存になります。
9 通信距離
iOSデバイスをCentralとして,XIAO ESP32S3に付属の紙のようなアンテナをつけた状態で通信距離を測定しました。
見通しの良い直線で130mまでの通信が確認できました。
測定場所の都合でそれ以上距離を伸ばせなかったですが,通信限界はもう少し先になると思います。
Bluetooth4.0(LE)は通信範囲100mと言われています。(手元で試したら直線の見通せる場所で50mでした。)
Bluetooth5.0(LE)は通信範囲400mと言われています。
10 発熱に関して
通信時には指先で触っていられないほどESP32S3が高温になっていたので気になったので長時間通信を行いました。
iOSデバイスをCentralとして,XIAO ESP32S3に付属の紙のようなアンテナをつけた状態で通信を行いました。
通信は1秒ごとに行われ,XIAO ESP32S3からiOSデバイスに温度[℃],気圧[hPa],標高[m]を送信していました。
30℃を超える気温の中で,連続送信していたところ,1時間程度で通信が途絶えてしまいました。
再度送信を開始したところ,今度は3時間ほどで通信が途絶えてしまいました。
気温が30℃を下回ったところで,再再度送信を開始したところ,8時間の送信で異常は起きませんでした。
周囲温度が高いときは,異常終了する可能性があることがわかりました。
一般に通信距離が2倍になると4倍の電力を消費するため,この発熱はBluetooth5.0(LE)になったことに起因していると考えられます。
11 まとめ
Wi-FiマイコンXIAO ESP32S3とiOSデバイスでBLE Uart通信し,iOSデバイスからの指令によって文字列をXIAO ESP32S3が送るプログラムを示しました。
Wi-FiマイコンXIAO ESP32S3とiOSデバイスでBLE Uart通信し,iOSデバイスからの指令によって温度などのデータをXIAO ESP32S3が送るプログラムを示しました。
XIAO ESP32S3側のプログラムで,受信文字列を取り出す部分と,送信したい文字列を送信する部分を示しました。
XIAO ESP32S3がBLE通信するときは,発熱が大きく問題が生ずるの可能性があるため,放熱対策をしたほうが安全と思われます。
この記事ではiOSデバイスのアプリ"Bluefruit Connect"を使いました。
Androidデバイスにもアプリ"Bluefruit Connect"があり,iOS版"Bluefruit Connect"と同じ使い方ができます。
WindowsPCにも同様なアプリ"BLE_serial_terminal"があり,同様の使い方ができます。
Androidデバイス版の解説
WindowsPC版の解説