Wi-FiマイコンXIAO ESP32S3とWindowsPCとのBLE Uart通信
NimBLE採用
(1) ESP32S3単体とWindowsPCの通信
(2) ESP32S3+温度センサBMP280とWindowsPCの通信
2026.3.24 Coskx Lab
0 コンパイル環境に関するコメント
ArduinoIDEにおける「ESP32 by Espressif Systems」のBLE関連のボードライブラリ(20260326現在バージョン3.3.7)の動作が不安定です。
ESP32S3のBLEデモプログラムで,対Androidスマホでは通信可能ですが,対WinPCでは通信できません。2026年3月現在
そこで,軽量ライブラリとして開発され,安定動作とされているNimBLEをESP32S3のデモプログラムに採用して,
対Androidスマホ,対WinPCともに良好な通信ができることを確認しました。
BLEの不具合関係は次のところにまとめてあります。
既知のBLEの不具合2026Mar
1 はじめに
温度センサBMP280を載せたWi-FiマイコンXIAO ESP32S3からWindowsパソコンに向けてBLE(Bluetooth Low Energy)を使って温度情報を送ります。
Wi-FiマイコンとWindowsパソコン間の通信は無線LAN環境の下ではHTTPでの通信ができますが,無線LAN環境がない場合では,Bluetooth通信が便利です。
XIAO ESP32S3はBLE UART Profileを使って通信します。(Bluetooth Classicではありません。)
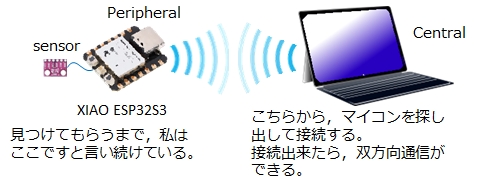
BLEコネクション通信では,Central(or Master or Observer)とPeripheral(or Slave or Broadcaster)の間で通信が行われます。
ここでは,WindowsPCをCentral,XIAO-ESP32S3をPeripheralとして使うことにします。
(PeripheralはServer,CentralはClientと説明されることもあります。)
なお,ここで使用するWindowsPCのアプリ"BLE_serial_terminal"は起動の度に,通信相手を探して接続するようになっているため,ペアリングを必要としていません。
2 使用環境
- Windows 11 64-bit
- ArduinoIDE 2.3.8
- ESP32 by Espressif Systems Ver3.3.7
- ArduinoIDEライブラリ NimBLE-Arduino/h2zero V2.4.0
- XIAO ESP32S3
- BMP280 (HW-611 E/P 280)
(BLE Uart通信のテストだけなら不要) - WindowsPC + "BLE_serial_terminal"
(PCがbluetooth機能を持っていない場合はbluetoothアダプタを使用)
3 準備
3.1 ArduinoIDE
(1)Arduino IDEのメニューバーから[ファイルFile] -> [環境設定(Preferences)]
Additional board manager URLsに
https://files.seeedstudio.com/arduino/package_seeeduino_boards_index.json
および
https://raw.githubusercontent.com/espressif/arduino-esp32/gh-pages/package_esp32_index.json
を設定してOK
(2)ツール[Tools] > ボード[Board] > Boards Manager
検索boxに「ESP」を入力すると複数のボード候補が出てくるので
esp32 by Espressif Systems
をinstall
(3)ツール[Tools] > ボード[Board]でESP32を探すとXIAO ESP32S3が見つかるので,これを選ぶ。
3.2 XIAO ESP32S3
XIAO ESP32S3の説明書を読んで,ArduinoIDEで制作したプログラムをXIAO ESP32S3に転送する方法を確認しておきます。
(USBケーブルでつないで書き込むだけでした。)
4 XIAO ESP32S3と温度センサBMP280の配線
(BLE Uart通信のテストだけならBMP280は使用しないので,ここは読み飛ばしてください)
温度センサBMP280は温度をデジタル値に変換しているので,そのデータをXIAO ESP32S3が読み出します。
XIAO ESP32S3と温度センサBMP280はI2C接続ですので,電源線,GND線の他はSCLとSDAの2本のみで通信できます。
CSBをVCCにつなぐとBMP280はI2C接続になります。(データシートによれば確実にVCCにつなぐべきとなっています)
SDO(シルク印刷は間違えていてSDDとなっている)をVCCにつなぐとBMP280のI2Cアドレスは77になります。GNDにつなぐとBMP280のI2Cアドレスは76になります。Groveライブラリのデフォルトは77なのでVCCにつないでいます。
なおBMP280ではSDA,SCLをpullupせずに動作しています。
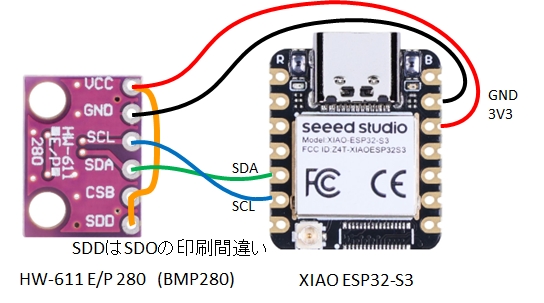
XIAO ESP32S3と温度センサBMP280の配線
ブレッドボードには載せないので,XIAO ESP32S3のピンを上向きに付けています。
XIAO ESP32S3と温度センサBMP280
5 XIAO ESP32S3のスケッチコード(サーバプログラム)
ここでは,
(1)BMP280を使用せず,BLE Uart通信のテストだけのプログラム
(2)BMP280を使用して,BLE Uart通信で温度などの情報を送信するプログラム
の2つを紹介します。
5.1 BMP280を使用せず,NimBLE Uart通信のテスト
プログラムの概要
クライアント(WindowsPC)と接続出来たら,サーバであるXIAO ESP32S3は,5秒ごとに文字列"Hello"とデバイス名を,クライアントに返します。
また,クライアントから,何かの文字列を受信したら,その文字列をそのままクライアントに送信します。
説明
UART通信ですので,プログラム中の受信のパートと送信のパートが分かれば,そこにやりたいことを書けばよいことになります。
受信時はclass MyCallbacks : public NimBLECharacteristicCallbacksのonWrite()が呼び出され,String rxValueに受信文字列が保存されます。
ここが受信のパートになります。
loop()内でdeviceConnectedがtrueで,5秒が経過したら,送信すべきデータ文字列(文字列"Hello"とデバイス名)を作って,送信します。
ここが送信パートになります。
もう少し要点を絞ってみます。
◎受信時は,
void onWrite(NimBLECharacteristic* ch, NimBLEConnInfo& info)
が呼び出されて,
String rxValue = ch->getValue();
で,String型の文字列rxValueに受信文字列が得られます。
◎送信時は,送信したいString型の文字列を
pTxCharacteristic->setValue();
で送って
pTxCharacteristic->notify();
で送信相手に送ったよと知らせて完了です。
なお,
#define DEVICE_NAME "NimBLE-UART-E-0"
は自分の名前です。通信相手のWindowsPCなどから見つけてもらう名前です。
Arduino IDEでコンパイルするときは,ライブラリ"NimBLE-Arduino/h2zero"を予めIDEに追加しておいてください。
//Arduino Library : NimBLE-Arduino/h2zero
//XIAO-ESP32S3
#include <NimBLEDevice.h>
NimBLEServer *pServer = NULL;
NimBLEAdvertising *pAdvertising = NULL;
NimBLECharacteristic *pTxCharacteristic;
bool deviceConnected = false;
bool oldDeviceConnected = false;
// See the following for generating UUIDs:
// https://www.uuidgenerator.net/
#define SERVICE_UUID "6E400001-B5A3-F393-E0A9-E50E24DCCA9E" // UART service UUID
#define CHARACTERISTIC_UUID_RX "6E400002-B5A3-F393-E0A9-E50E24DCCA9E"
#define CHARACTERISTIC_UUID_TX "6E400003-B5A3-F393-E0A9-E50E24DCCA9E"
#define DEVICE_NAME "NimBLE-UART-E-0"
class MyServerCallbacks : public NimBLEServerCallbacks {
void onConnect(NimBLEServer* pServer, NimBLEConnInfo& connInfo) {
deviceConnected = true;
};
void onDisconnect(NimBLEServer* pServer, NimBLEConnInfo& connInfo, int reason) {
deviceConnected = false;
}
};
class MyCallbacks : public NimBLECharacteristicCallbacks {
void onWrite(NimBLECharacteristic* ch, NimBLEConnInfo& info) {
String rxValue = ch->getValue();
if (rxValue.length() > 0) {
rxValue.trim();
Serial.printf(">> received string : %s\n", rxValue);
delay(10);
//Reply as is
pTxCharacteristic->setValue(rxValue);
pTxCharacteristic->notify();
delay(10);
}
}
};
void setup() {
delay(1000); //Wait until the boot message finishes.
Serial.begin(115200);
delay(200);
String devicename = DEVICE_NAME;
std::string ssdevicename = std::string(devicename.c_str());
// Create the NimBLE Device
NimBLEDevice::init(ssdevicename);
NimBLEDevice::setMTU(247);
// Create the NimBLE Server
pServer = NimBLEDevice::createServer();
pServer->setCallbacks(new MyServerCallbacks());
// Create the NimBLE Service
NimBLEService *pService = pServer->createService(SERVICE_UUID);
// Create a NimBLE Characteristic
pTxCharacteristic = pService->createCharacteristic(CHARACTERISTIC_UUID_TX,
NIMBLE_PROPERTY::NOTIFY);
NimBLECharacteristic *pRxCharacteristic;
pRxCharacteristic = pService->createCharacteristic(CHARACTERISTIC_UUID_RX,
NIMBLE_PROPERTY::WRITE | NIMBLE_PROPERTY::WRITE_NR);
pRxCharacteristic->setCallbacks(new MyCallbacks());
// Start the service
pService->start();
pAdvertising = NimBLEDevice::getAdvertising();
NimBLEAdvertisementData advData = NimBLEAdvertisementData();
advData.addServiceUUID(SERVICE_UUID);
//advData.setName(DEVICE_NAME); //デバイス短縮名を入れるのが本来の用途
pAdvertising->setAdvertisementData(advData);
NimBLEAdvertisementData scanData = NimBLEAdvertisementData();;
scanData.setName(DEVICE_NAME);
scanData.addServiceUUID(SERVICE_UUID);
pAdvertising->setScanResponseData(scanData);
pAdvertising->enableScanResponse(true);
//pAdvertising->setName(DEVICE_NAME); //これではデバイス名は8文字までになってしまう
//pAdvertising->addServiceUUID(SERVICE_UUID);
//pAdvertising->setMinPreferred(0x06); // helps with iPhone connections
//pAdvertising->setMaxPreferred(0x12);
//pAdvertising->setMinInterval(0x20); // 40ms helps with WINPC connections
//pAdvertising->setMaxInterval(0x40); // 80ms
pAdvertising->start();
Serial.println(DEVICE_NAME);
Serial.println("Started advertising.");
}
void loop() {
if (deviceConnected) {
static uint32_t last = 0;
// 定期送信
if (millis() - last > 5000) {
last = millis();
const char* msg = "Hello from < " DEVICE_NAME " >\n";
pTxCharacteristic->setValue(msg);
pTxCharacteristic->notify();
}
}
// disconnecting
if (!deviceConnected && oldDeviceConnected) {
delay(500); // give the bluetooth stack the chance to get things ready
pAdvertising->start();
Serial.println("Device disconnected\n");
Serial.println(DEVICE_NAME);
Serial.println("Restarted advertising.");
oldDeviceConnected = false;
}
// connecting
if (deviceConnected && !oldDeviceConnected) {
delay(500); // give the bluetooth stack the chance to get things ready
Serial.println("Device connected");
oldDeviceConnected = true;
}
}
5.2 BMP280を使用して,NimBLE Uart通信で温度などの情報を送信
プログラムの概要
クライアント(WindowsPCなど)からのリクエストで,サーバであるXIAO ESP32S3は,温度センサBMP280の値を取得し,クライアントに返します。
具体的には,XIAO ESP32S3は文字列"start"を受け取ったら1秒間隔で温度などのデータを送信し,文字列"stop"を受け取ったら送信をやめるようにします。
説明
UART通信ですので,プログラム中の受信のパートと送信のパートが分かれば,そこにやりたいことを書けばよいことになります。
受信時はclass MyCallbacks: public BLECharacteristicCallbacksのonWrite()が呼び出され,String rxValueに受信文字列が保存されます。
ここが受信のパートになります。
受信パートでは受信文字列が"start","stop"であった時には,作業フラグisrequestedをそれぞれtrue,falseに設定します。
loop()内でdeviceConnected およびisrequestedがtrueで,一定時間が経過したら,温度などを測定して,送信すべきデータ文字列("温度","気圧","標高")を作って,送信します。
ここが送信パートになります。
もう少し要点を絞ってみます。
◎受信時は,
void onWrite(NimBLECharacteristic* ch, NimBLEConnInfo& info)
が呼び出されて,
String rxValue = ch->getValue();
で,String型の文字列rxValueに受信文字列が得られます。
◎送信時は,送信したいString型の文字列を
pTxCharacteristic->setValue();
で送って
pTxCharacteristic->notify();
で送信相手に送ったよと知らせて完了です。
なお,
#define DEVICENAME "ESP32-BME280"
は自分の名前です。通信相手のWindowsPCなどから見つけてもらう名前です。
#define INTERVAL 1000 //millisec
を変更するとデータ送信間隔が変わります。
Arduino IDEでコンパイルするときは,ライブラリ"Adafruit BMP280 Library/Adafruit"を予めIDEに追加しておいてください。
//Arduino Library : NimBLE-Arduino/h2zero
//Arduino Library : Adafruit BMP280 Library/Adafruit
//XIAO-ESP32S3
#include <NimBLEDevice.h>
#include <Adafruit_BMP280.h>
#define DEVICENAME "ESP32-BMP280"
#define INTERVAL 1000 //millisec
// See the following for generating UUIDs:
// https://www.uuidgenerator.net/
#define SERVICE_UUID "6E400001-B5A3-F393-E0A9-E50E24DCCA9E" // UART service UUID
#define CHARACTERISTIC_UUID_RX "6E400002-B5A3-F393-E0A9-E50E24DCCA9E"
#define CHARACTERISTIC_UUID_TX "6E400003-B5A3-F393-E0A9-E50E24DCCA9E"
NimBLEServer *pServer = NULL;
NimBLEAdvertising *pAdvertising = NULL;
NimBLECharacteristic *pTxCharacteristic;
bool deviceConnected = false;
bool oldDeviceConnected = false;
boolean isrequested = false;
Adafruit_BMP280 bmp280;
int interval = INTERVAL; //millisec
int currenttime = 0; //millisec
int previoustime = 0; //millisec
class MyServerCallbacks: public NimBLEServerCallbacks {
void onConnect(NimBLEServer* pServer, NimBLEConnInfo& connInfo) {
deviceConnected = true;
Serial.println("** device connected");
};
void onDisconnect(NimBLEServer* pServer, NimBLEConnInfo& connInfo, int reason) {
deviceConnected = false;
Serial.println("** device disconnected");
}
};
class MyCallbacks: public BLECharacteristicCallbacks {
void onWrite(NimBLECharacteristic* ch, NimBLEConnInfo& info) {
String rxValue = ch->getValue();
if (rxValue.length() > 0) {
delay(10);
Serial.print("Received Value: ");
rxValue.trim();
Serial.println(rxValue);
delay(100);
//Reply as is
pTxCharacteristic->setValue(rxValue);
pTxCharacteristic->notify();
delay(10);
if (rxValue.indexOf("start") == 0) { //"start" has found
isrequested = true;
} else if (rxValue.indexOf("stop") == 0) { //"stop" has found
isrequested = false;
}
}
}
};
void setup() {
delay(1000); //Wait until the boot message finishes.
Serial.begin(115200);
delay(200);
String devicename = DEVICENAME;
std::string ssdevicename = std::string(devicename.c_str());
// Create the NimBLE Device
BLEDevice::init(ssdevicename); //BLE Device Name scaned and found by clients
NimBLEDevice::setMTU(247);
// Create the NimBLE Server
pServer = NimBLEDevice::createServer();
pServer->setCallbacks(new MyServerCallbacks());
// Create the NimBLE Service
NimBLEService *pService = pServer->createService(SERVICE_UUID);
// Create a NimBLE Characteristic
pTxCharacteristic = pService->createCharacteristic(CHARACTERISTIC_UUID_TX,
NIMBLE_PROPERTY::NOTIFY);
NimBLECharacteristic *pRxCharacteristic;
pRxCharacteristic = pService->createCharacteristic(CHARACTERISTIC_UUID_RX,
NIMBLE_PROPERTY::WRITE | NIMBLE_PROPERTY::WRITE_NR);
pRxCharacteristic->setCallbacks(new MyCallbacks());
// Start the service
pService->start();
// Start advertising
pAdvertising = NimBLEDevice::getAdvertising();
NimBLEAdvertisementData advData = NimBLEAdvertisementData();
advData.addServiceUUID(SERVICE_UUID);
pAdvertising->setAdvertisementData(advData);
NimBLEAdvertisementData scanData = NimBLEAdvertisementData();;
scanData.setName(DEVICENAME);
scanData.addServiceUUID(SERVICE_UUID);
pAdvertising->setScanResponseData(scanData);
pAdvertising->enableScanResponse(true);
pAdvertising->start();
Serial.println(DEVICENAME);
Serial.println("Started advertising.");
//start BMP280
if(!bmp280.begin()) {
Serial.println("bmp280 Device error!");
} else {
Serial.println("bmp280 Device started.");
}
}
void loop() {
static int count = 0;
if (deviceConnected) {
if (isrequested) {
if (++count == 1) {
delay(200);
pTxCharacteristic->setValue("temp[degC], press[hPa], alt[m]\n");
pTxCharacteristic->notify();
previoustime = millis(); //elapsed time(ms)
}
currenttime = millis(); //elapsed time(ms)
if (interval <= currenttime - previoustime) {
previoustime += interval;
//BMP280 work begin
float tempreture = bmp280.readTemperature();
float pressure = bmp280.readPressure();
float altitude = bmp280.readAltitude(1013.);
char string0[256];
sprintf(string0, "%.1f, %.0f, %.2f\n", tempreture, pressure/100.f, altitude);
//BMP280 work end
pTxCharacteristic->setValue((String)string0);
pTxCharacteristic->notify();
delay(10);
}
} else {
count = 0;
}
} else {
isrequested = false;
count = 0;
}
// disconnecting
if (!deviceConnected && oldDeviceConnected) {
delay(500); // give the bluetooth stack the chance to get things ready
pAdvertising->start();
Serial.println("Device disconnected\n");
Serial.println(DEVICENAME);
Serial.println("Restarted advertising.");
oldDeviceConnected = deviceConnected;
}
// connecting
if (deviceConnected && !oldDeviceConnected) {
delay(500); // give the bluetooth stack the chance to get things ready
Serial.println("Device connected");
oldDeviceConnected = deviceConnected;
}
}
6 WindowsパソコンとXIAO ESP32S3のペアリング
◎このペアリング作業は不要です。
7 Windowsアプリ"BLE_serial_terminal"の準備
Githubから"BLE_serial_terminal"β版をダウンロードします。
Github "BLE_serial_terminal"
- URL https://github.com/healthywalk/BLE-Serial-Terminal/ を開きます。
- 「code」とラベル付けされた緑色のボタンから「Download Zip」を選択します。
- 「BLE-Serial-Terminal-main.zip」がダウンロードされるので、解凍します。
- 「BLE_Serial_Terminal.exe」は BLE-Serial-Terminal-main \ BLE_Serial_Terminal \ bin \ Release にあります。
- 「BLE_Serial_Terminal.exe」を便利な場所に置き、ダブルクリックで起動できます。
"BLE_serial_terminal"のアイコン
8 XiaoESP32S3と"BLE_serial_terminal"の通信
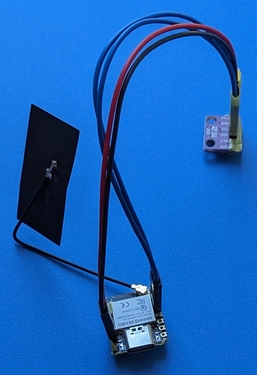
先にXiaoESP32S3に電源を与え,立ち上げておきます。
"BMP280が接続されたXIAO ESP32S3(紙のアンテナがついています。)
その後,"BLE_serial_terminal.exe"を立ち上げるとすぐにBruetoothLEデバイスをスキャンして選択リストに表示します。
ここでは,XiaoESP32S3のプログラムの
#define DEVICENAME "ESP32-BMP280"
でつけた名前"ESP32-BMP280"が見つかるのでこれをクリックして選択します。
見つからなかったら,ボタン"Scan BLE Dev"をクリックして,にBruetoothLEデバイスを再スキャンします。
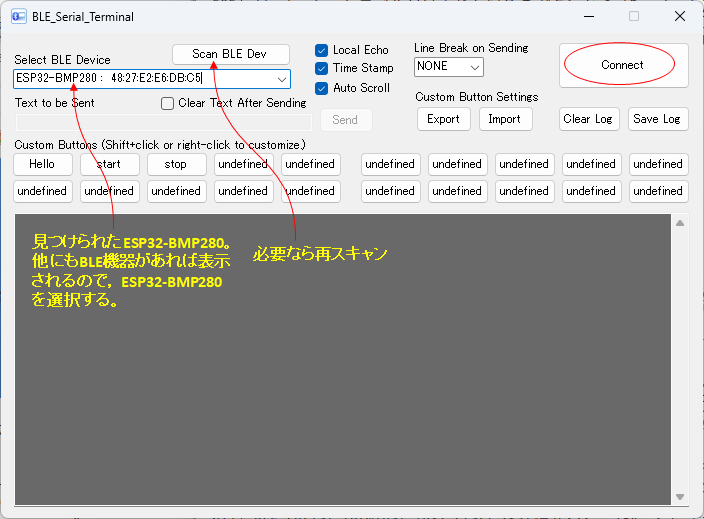
BLE_serial_terminal デバイス選択画面
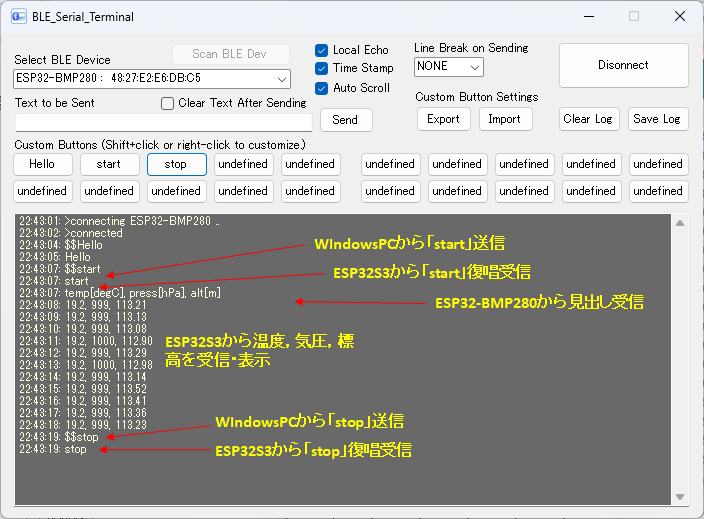
選択したら,ボタンConnectをクリックします。connectedが表示されたら,通信準備完了です。
"Time Stamp"および"Local Echo"のオプションをONにしておくとよいでしょう。
"BLE_serial_terminal"から"start"を送信すると,1秒ごとにデータが送信されてきます。
受信した3つの数値は温度[℃],気圧[hPa],標高[m]を表しています。
"BLE_serial_terminal"から"stop"を送信すると,データ送信が止まります。
"BLE_serial_terminal"から"start"や"stop"を送信するときは,画面上部のテキストボックスに入力してボタンSendをクリックします。
カスタムボタンに"start"や"stop"を登録しておくと,そのボタンをクリックするだけになるので便利です。
画面上の送受信データのファイルへの保存は,右上のボタン"Save Log"で出来ます。
BLE_serial_terminal 通信画面
9 まとめ
(1)Wi-FiマイコンXIAO ESP32S3のBLE Uart通信をNimBLEで作りました。
(2)Wi-FiマイコンXIAO ESP32S3とWindowsパソコンでBLE Uart通信し,一定時間ごとに文字列をXIAO ESP32S3が送るプログラムを示しました。
(3)Wi-FiマイコンXIAO ESP32S3とWindowsパソコンでBLE Uart通信し,Windowsパソコンからの指令によって温度などのデータをXIAO ESP32S3が送るプログラムを示しました。
XIAO ESP32S3側のプログラムで,受信文字列を取り出す部分と,送信したい文字列を送信する部分を示しました。
この記事ではWindowsパソコンのアプリ"BLE_serial_terminal"を使いました。
AndroidデバイスにもiOSデバイスにも同様なアプリがあり,"BLE_serial_terminal"と同じ使い方ができます。
Androidデバイス版の解説
iOSデバイス版の解説